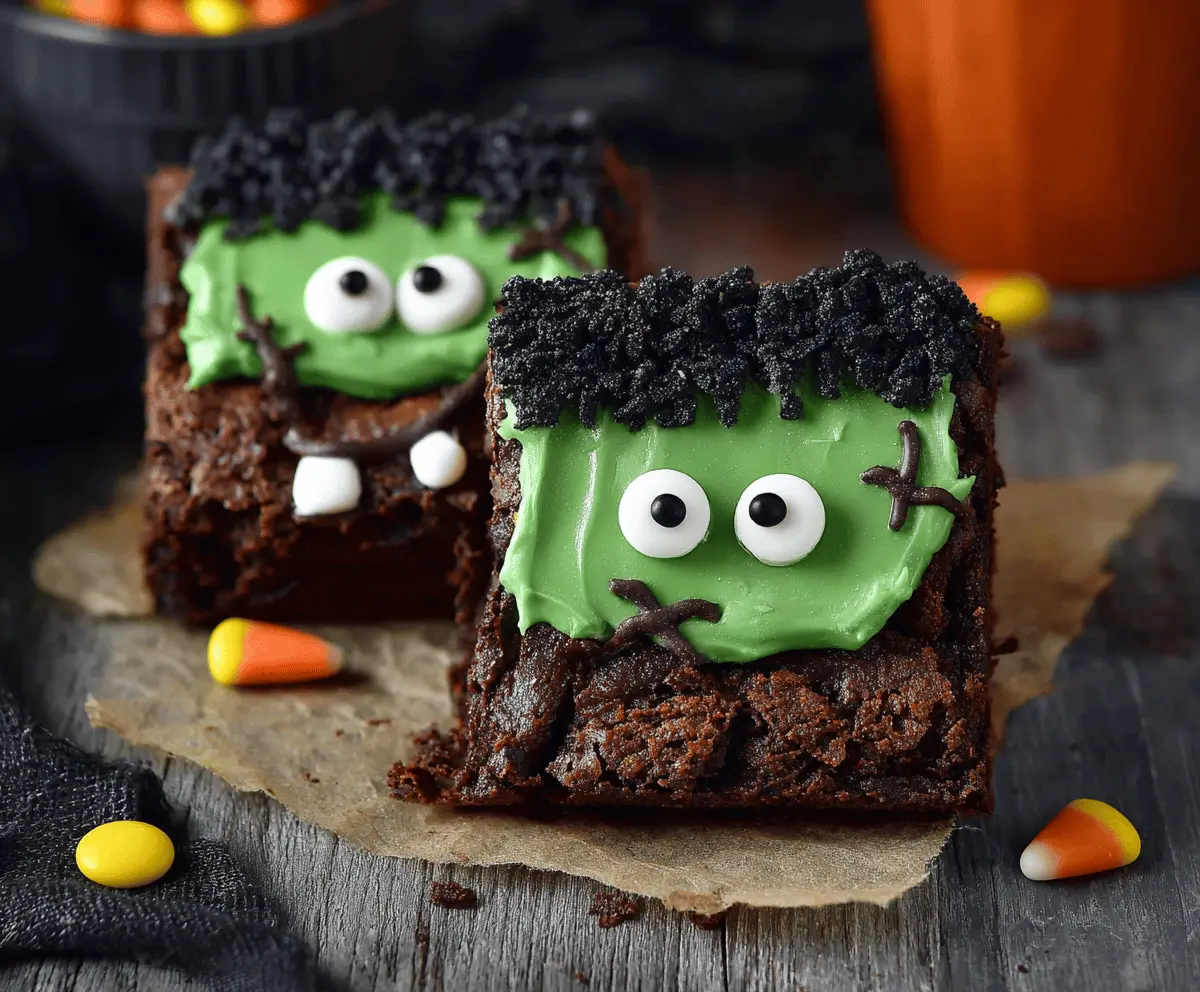
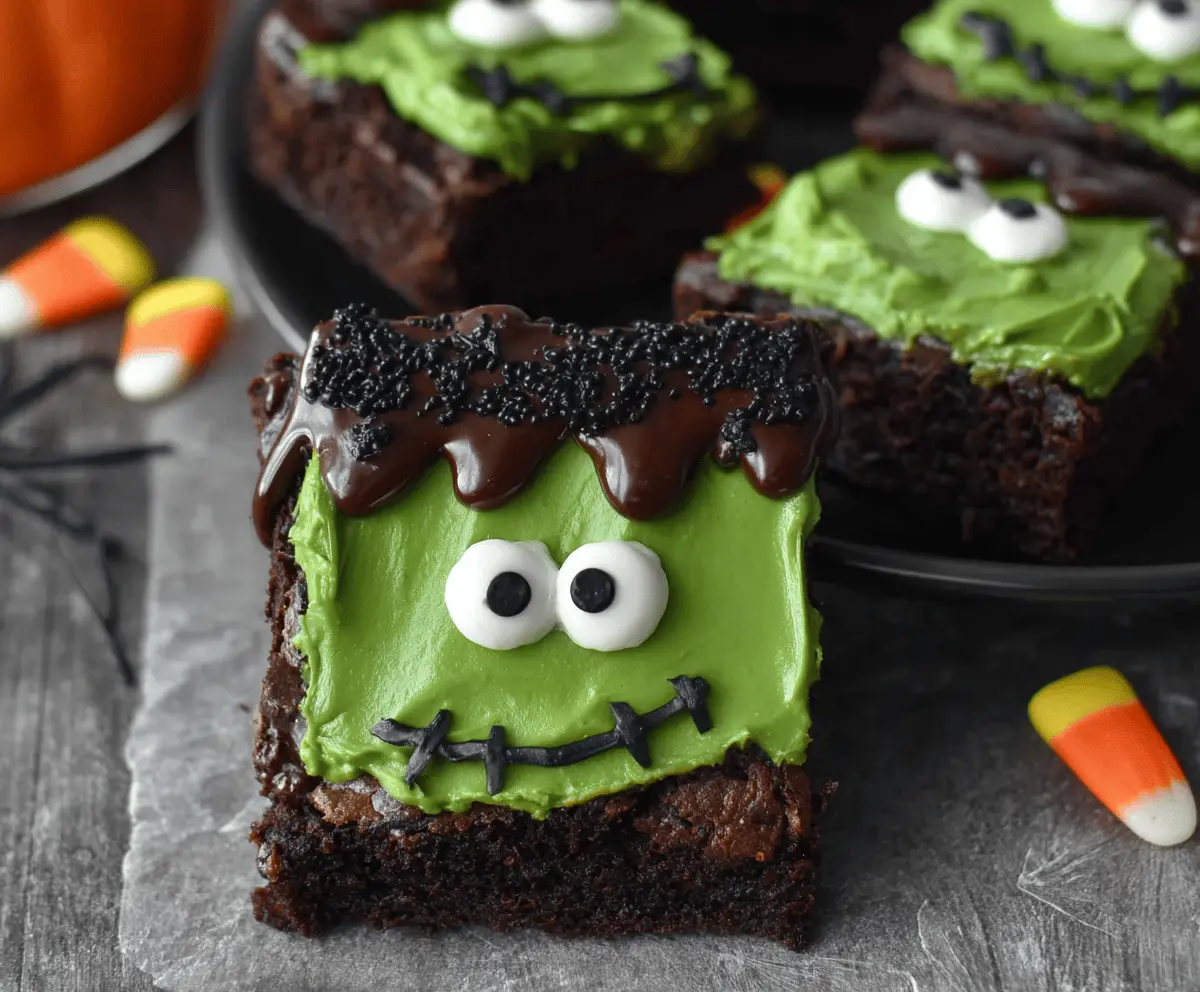
Spooky-cute, fudgy, and frightfully fun—these Frankenstein Brownies are a party-perfect Halloween treat you can whip up with pantry staples. Start with intensely chocolaty, extra-moist brownies as the base (boxed mix or from-scratch—your call), then top with a creamy green vanilla frosting, candy eyes, and a quick chocolate “haircut.” Add pretzel-rod “neck bolts” and a stitched smile, and you’ve got edible little monsters that steal the dessert table.
They’re easy to decorate, great for kids’ helping hands, and totally customizable—think mint-green faces, peanut-butter hair, or orange jack-o’-lantern pals made from the same pan. Bake ahead and decorate later, or assemble the whole batch a few hours before your party so the frosting sets and the faces stay picture-perfect.
Make a double pan if you’re feeding a crowd—these fudgy squares disappear faster than you can say “It’s alive!”
Key Ingredients & Substitutions
Use a boxed mix for speed or a simple from-scratch batter for bakery-level fudginess. The decorations are flexible—mix and match with what you have.
Brownies: One 9×13-inch pan of fudgy brownies (boxed mix prepared per package or your favorite recipe). For cakier brownies, bake 2–3 minutes longer. Gluten-free mix works great here.
Butter: For the frosting; unsalted keeps flavor balanced. Dairy-free butter sticks work if needed.
Powdered sugar: Sweetens and thickens the frosting without grittiness.
Vanilla & salt: Round the sweetness and make flavors pop.
Green coloring: Gel food color gives bright, Frankenstein-green without thinning the frosting. Mix yellow + a touch of blue if needed.
Chocolate: Melted chocolate or chocolate chips + a bit of oil for shiny “hair.” Chocolate frosting works in a pinch.
Candy eyes & decorations: Candy eyes for expression; mini pretzel sticks or rods for neck bolts; black writing gel or melted chocolate for scars and smiles.
Equipment You’ll Need
- 9×13-inch metal baking pan (for even baking)
- Parchment paper (sling for easy lift)
- Mixing bowls + whisk/spatula
- Hand mixer (optional, for ultra-smooth frosting)
- Small offset spatula for frosting
- Microwave-safe bowl (for melting chocolate)
- Piping bag or zip-top bag (for hair/scars), or a butter knife
Flavor Variations & Add-Ins
- Mint monster: Add 1/2 teaspoon peppermint extract to the frosting; sprinkle with crushed chocolate cookies as “crumbly hair.”
- Peanut-butter Frank: Spread a thin layer of peanut butter on cooled brownies before the green frosting.
- Cookies & scream: Fold 1 cup chopped Oreos into the batter for crunchy bits.
- Extra fudgy: Swirl 1/3 cup warm ganache over the green frosting, then add hair and eyes.
- Gluten-free: Use a GF brownie mix and confirm candy decorations are GF.
How to Make Frankenstein Brownies
Ingredients You’ll Need:
- Brownie base: One 9×13-inch pan of brownies, fully cooled
- Green frosting: 1/2 cup (113g) unsalted butter, softened; 2 1/4–2 1/2 cups (270–300g) powdered sugar; 1–2 tablespoons milk or cream; 1 teaspoon vanilla; pinch of salt; green gel coloring
- Hair & details: 3/4 cup chocolate chips + 2 teaspoons neutral oil (or 1 cup chocolate frosting); candy eyes; mini pretzel sticks/rods; black decorating gel or melted dark chocolate (for stitches/smile)
How Much Time Will You Need?
Brownies: 30–40 minutes to bake (plus cooling). Decorating: 20–30 minutes. Total: about 1 1/2–2 hours including cooling.
Step-by-Step Instructions:
1. Bake & cool the brownies
Prepare brownies in a parchment-lined 9×13-inch pan. For clean cuts, bake just until a tester comes out with moist crumbs (not wet batter). Cool completely in the pan, then lift out using the parchment sling.
2. Make the green frosting
Beat softened butter until smooth. Add powdered sugar, vanilla, salt, and 1 tablespoon milk; beat until fluffy and spreadable. Tint with green gel color (start with a small amount; add until bright Frankenstein green). Adjust consistency with an extra teaspoon of milk if needed—aim for thick but spreadable.
3. Frost and portion
Spread the green frosting over the cooled brownie slab in an even layer. For neat edges, chill the frosted slab 10–15 minutes, then cut into rectangles (about 2×3 inches) to form “faces.”
4. Add hair
Melt chocolate chips with oil in 20–30 second microwave bursts, stirring until smooth. Spoon or pipe a “hairline” across the top of each brownie and fill in to the edge with jagged points. Let set a few minutes (or use chocolate frosting and swoop with a knife).
5. Eyes, bolts, and expressions
Press two candy eyes below the hairline. Poke a mini pretzel piece into each side as neck bolts. Use black gel or a small piping bag with melted chocolate to draw a stitched smile and a forehead scar. Add brows or fangs for personality if you like.
6. Set & serve
Let decorations set 10–15 minutes at room temperature (or chill briefly). Arrange on a platter and serve with extra napkins—fudgy factor is high!
Pro Tips for Best Texture & Clean Cuts
- Chill before slicing: Pop the frosted slab in the fridge for 10–15 minutes for cleaner, sharper squares.
- Warm knife, wipe between cuts: Dip in hot water, wipe dry, cut, and repeat.
- Thick frosting = neat faces: A slightly thicker frosting layer holds eyes and details better.
- Keep decorations dry: Pat candy eyes/pretzels if dusty or oily so they adhere cleanly.
- Set the chocolate hair: Give it a few minutes to firm up before adding eyes so they don’t slide.
Frequently Asked Questions
Can I make these ahead?
Yes. Bake brownies up to 2 days ahead (wrap tightly). Decorate up to 1 day before serving and store covered at cool room temp. For longer storage, refrigerate decorated brownies and bring to room temp before serving.
Do they freeze well?
Brownies freeze beautifully. Freeze the undecorated slab up to 2 months; thaw, then frost and decorate. Decorated brownies can be frozen, but candy eyes may dull—wrap well and thaw in the fridge.
How do I keep brownies fudgy, not cakey?
Don’t overbake—pull when a tester shows moist crumbs. If baking from scratch, use melted butter/oil and more brown sugar for fudginess.
No candy eyes—now what?
Pipe eyes with dots of white frosting and add tiny chocolate chips or sprinkles as pupils. Mini marshmallow slices also work in a pinch.
How big should I cut them?
2×3 inches is a nice “face” size. For party bites, halve that for minis; for bake sales, go 3×3 inches for generous squares.