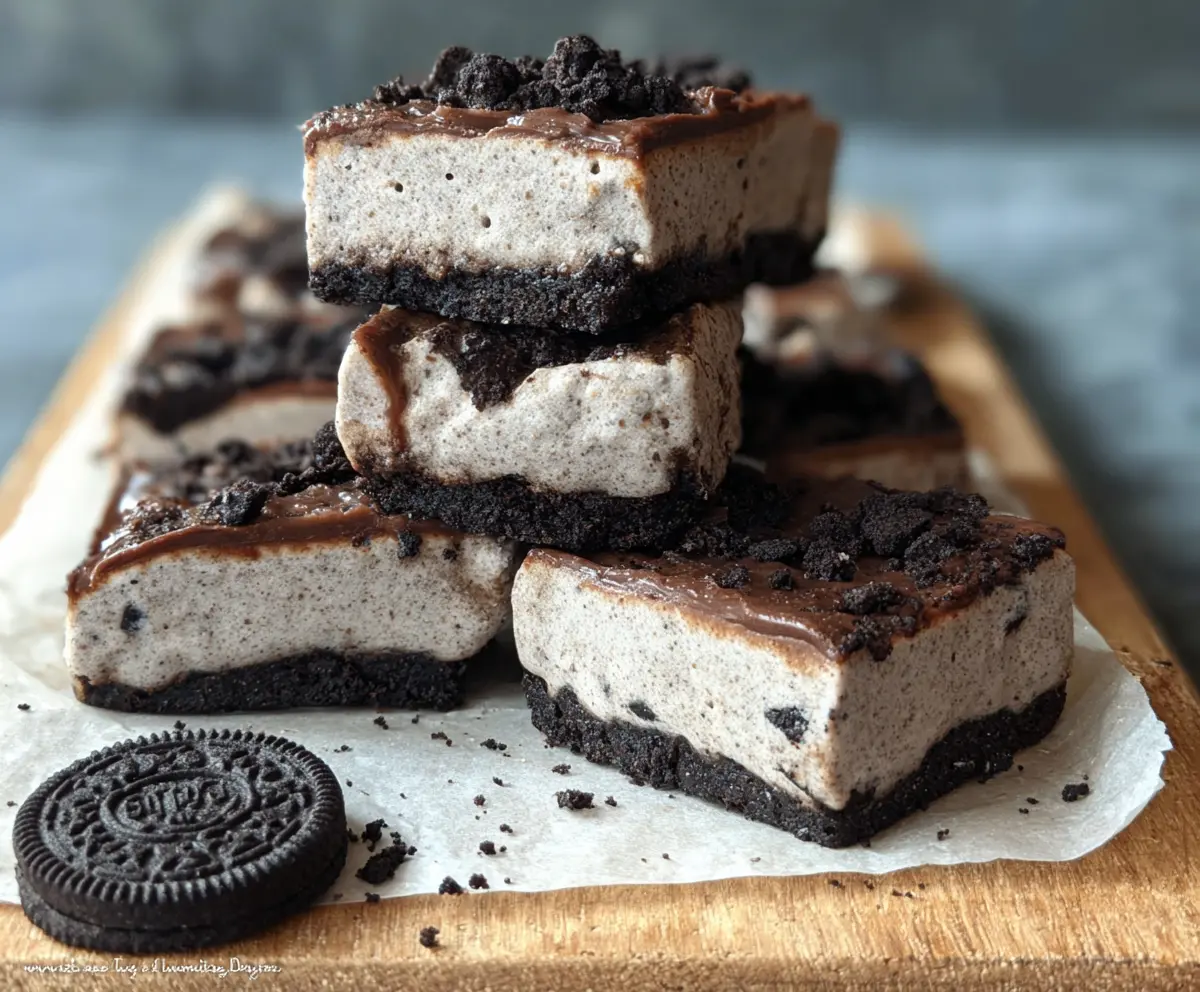
These No Bake Oreo Protein Bars are a fun and tasty treat! Packed with chocolatey flavor and crunchy Oreo bits, they are perfect for a quick snack or post-workout boost.
I love how simple they are to make—just mix, press, and chill! Plus, they satisfy any sweet tooth without the baking fuss. Who can resist a cookie in a protein bar? 🍪💪
Key Ingredients & Substitutions
Oreo Cookies: The heart of these bars! You can use regular or double stuffing Oreos. If you’re looking for a healthier option, consider using a gluten-free cookie or even a different flavor like peanut butter cookies for a twist.
Protein Powder: Vanilla or cookies & cream protein powder works best. If you’re dairy-free, opt for plant-based protein powder. Just keep in mind that different powders can change the texture slightly; experimentation is key!
Cream Cheese: Light cream cheese helps keep the bars creamy. For a non-dairy alternative, use vegan cream cheese or silken tofu, blended until smooth—it’ll still hold the creamy texture!
Milk: Any type of milk, whether dairy or plant-based, will do. Almond or oat milk can lend a subtle flavor, so choose what aligns with your taste or dietary needs.
Chocolate Hazelnut Spread: Nutella is a classic choice, but you can switch it up with any nut butter or melted chocolate for a different flavor profile. If you’re looking for a healthy twist, try a homemade date-cocoa spread instead.
How Can I Get the Perfect Firmness in My Protein Bars?
To ensure your bars set perfectly, follow these tips:
- Use softened cream cheese to prevent lumps and mix smoothly.
- Gradually add your milk until the mixture reaches a spreadable consistency, being careful not to make it too runny.
- Press the crumbled Oreos firmly into the pan for a solid crust—this helps the bars hold together once chilled.
- Refrigerate for a good 2-3 hours. If you’re in a hurry, popping them in the freezer for about an hour can work too, just be careful not to freeze them solid.
Remember, patience pays off, and giving the bars enough time to chill will result in a delightful treat every time!
No Bake Oreo Protein Bars
Ingredients You’ll Need:
For the Base:
- 20 Oreo cookies (regular or double stuffing)
For the Filling:
- 1 ½ cups vanilla or cookies & cream protein powder
- 1 ½ cups light cream cheese, softened
- 1/3 cup sugar or sweetener of choice
- 1/4 cup milk (dairy or plant-based)
- 1 teaspoon vanilla extract
For the Topping:
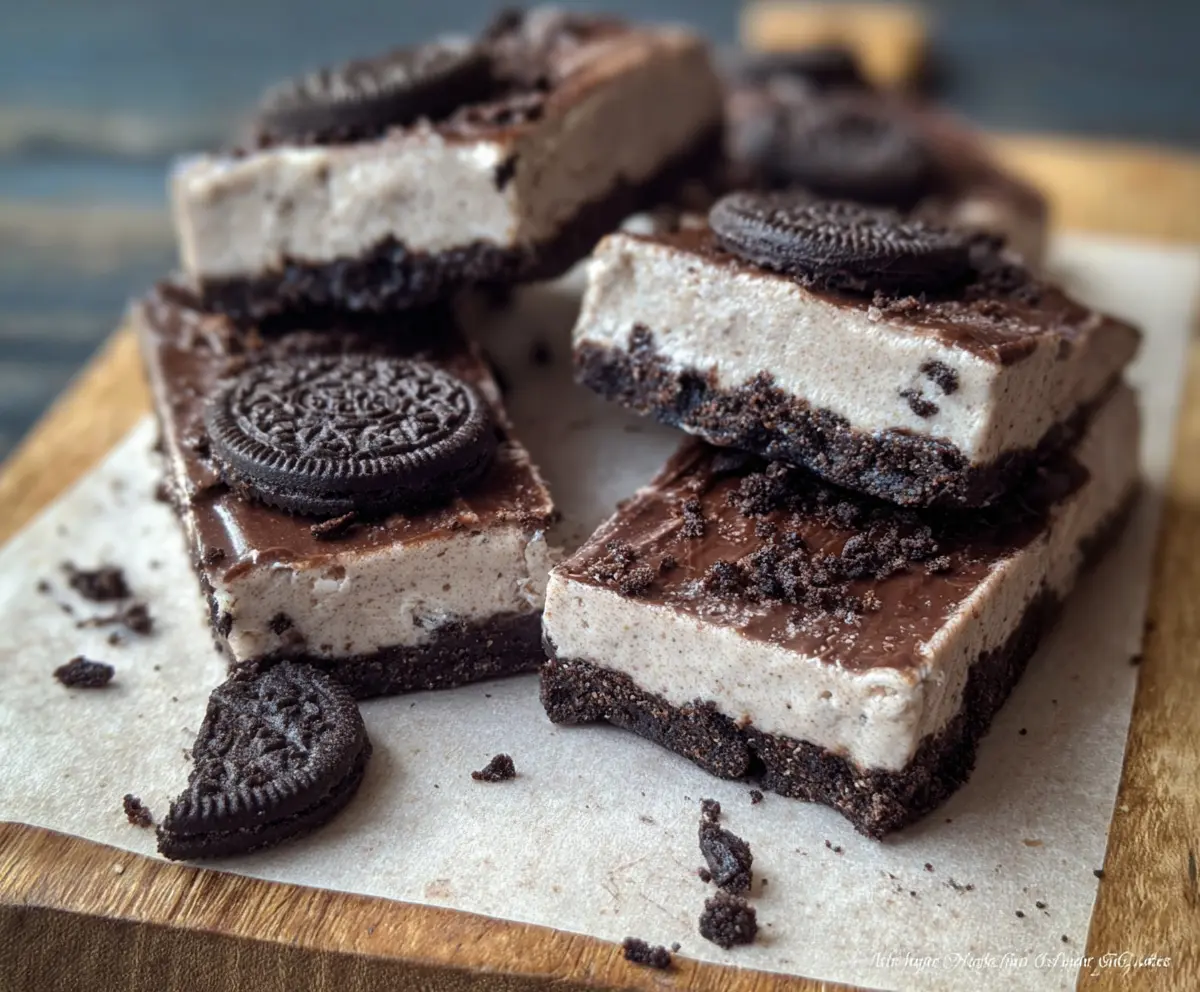
- 1/2 cup chocolate hazelnut spread (e.g., Nutella) or melted chocolate
- Additional crushed Oreos for garnish
How Much Time Will You Need?
This recipe takes about 15-20 minutes to prepare and requires at least 2-3 hours in the refrigerator to set properly. So, in total, you’ll need about 2-3 hours and 20 minutes before you can enjoy your delicious treat! Perfect for prepping in advance.
Step-by-Step Instructions:
1. Prepare the Pan:
Start by lining an 8×8-inch (or similar-sized) square pan with parchment paper. Leave some overhang on the sides. This makes it easy to lift the bars out once they’re set!
2. Make the Crust:
Take about 15 Oreos and put them into a plastic bag. Crush them finely with a rolling pin or pulse them in a food processor until you have a crumbly mixture. Press these crumbs firmly into the bottom of the prepared pan to form a nice, even crust. Get it as compact as possible!
3. Mix the Filling:
In a large mixing bowl, beat the softened cream cheese until it’s nice and smooth. Then, add the protein powder, sugar (or sweetener), and vanilla extract. Mix everything together until well combined.
4. Adjust the Consistency:
Gradually add the milk while stirring continuously. You want the mixture to be thick but still spreadable, so adjust the milk as needed!
5. Add the Oreo Crunch:
Take the remaining 5 Oreos, chop or crush them, and gently fold them into the protein mixture for some extra cookie goodness!
6. Assemble the Bars:
Spread the protein mixture evenly over the Oreo crust in the pan, smoothing the top so it looks nice and neat.
7. Add the Topping:
If you’re using chocolate hazelnut spread (like Nutella), warm it slightly in the microwave until it’s pourable. Drizzle or spread it over the layer you just made. If you’re using melted chocolate, do the same!
8. Garnish:
Finally, sprinkle some crushed Oreos on top for a delicious finishing touch!
9. Chill and Set:
Cover the pan and refrigerate for at least 2-3 hours, or until the bars are firm.
10. Enjoy!
Once set, lift the bars out of the pan using the parchment paper overhang, and cut them into squares. Store any leftovers in an airtight container in the fridge for up to a week. Enjoy your rich, creamy, and chocolatey No Bake Oreo Protein Bars—perfect for a sweet protein boost anytime!
Can I Use Different Types of Cookies?
Absolutely! While Oreos are the classic choice, you can substitute with other cookies like chocolate sandwich cookies or even gluten-free options if needed. Just ensure they’re similar in texture for the best results!
How Do I Get My Bars to Set Properly?
To ensure your bars set well, make sure to use softened cream cheese and mix until smooth. Press the Oreo crust firmly for a solid base, and refrigerate the bars for at least 2-3 hours. If you’re short on time, freezing them for about an hour can work too!
Can I Make These Bars Vegan?
Yes! For a vegan version, substitute the cream cheese with a vegan cream cheese or blended silken tofu. Also, use a plant-based protein powder and ensure your chocolate hazelnut spread is dairy-free. Check labels to confirm all ingredients meet vegan standards!
How Should I Store Leftovers?
Store any leftover bars in an airtight container in the refrigerator for up to one week. You can also freeze them for longer storage—just be sure to wrap them well to prevent freezer burn!