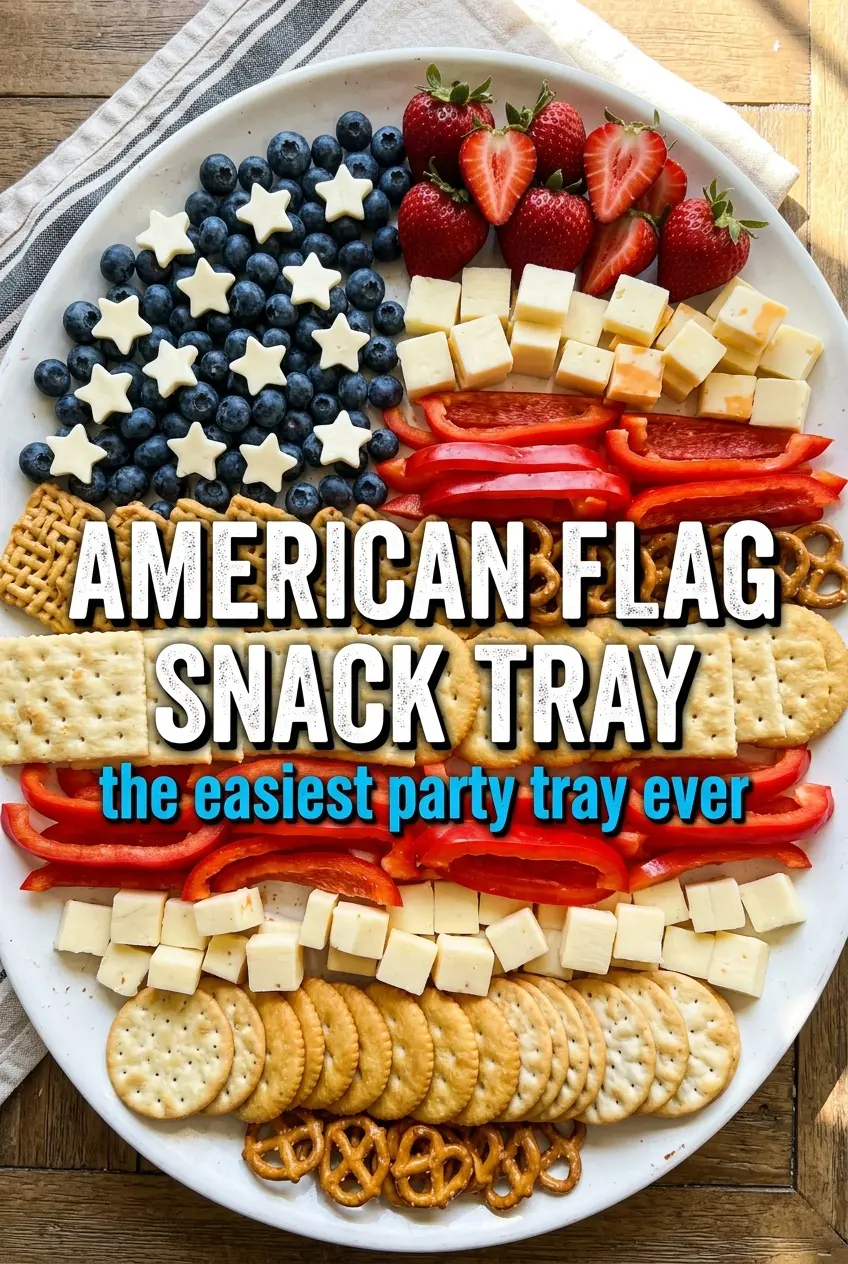
Sharp rows of berries, cheese, crackers, and pepperoni turn a simple snack board into the kind of appetizer people notice before they even take a bite. The American flag snack tray works because it leans into contrast: juicy strawberries against salty pepperoni, creamy white cheese next to crisp crackers, and a tight blueberry canton that reads clearly from across the table. It looks festive, but it eats like a smart party tray that keeps people circling back for one more handful.
The trick is structure. This board only works when the ingredients are packed closely enough to hold their shape, with the blueberries filling the upper-left corner densely and the stripes laid in clean, deliberate rows. Softer items like cheese cubes and strawberries need to stay in their lanes so the design doesn’t blur after ten minutes on the table. A tray with a little rim helps, but the real secret is choosing snacks that don’t roll, slump, or bleed color into each other.
Below, I’ll walk through the placement strategy that keeps the flag looking crisp, plus a few easy swaps if you want to adapt it for different crowds or make it ahead without losing that clean, color-blocked look.
The blueberry corner stayed packed and the strawberry rows held their shape the whole party. I loved that the crackers didn’t go soggy because everything was laid out right before serving.
Love the crisp stripes and star-spangled color contrast? Save this American flag snack tray for your next July 4th party or picnic spread.
The Part That Keeps the Flag Looking Sharp Instead of Messy
The difference between a board that reads as a flag and one that just looks like random snacks comes down to spacing. The blueberries need to be packed tight enough that the upper-left corner looks like one solid navy block, not a loose pile with gaps. The strawberry rows need to stay even, and the white stripes need enough contrast that the design still makes sense once people start grabbing pieces.
Use your most stable ingredients to draw the shape first. Blueberries, cheese cubes, and crackers build the visual structure; the pepperoni and strawberries fill in the color. If you start with the softest items, the board gets lopsided fast and you spend the rest of the time fixing it instead of serving it.
What Each Ingredient Is Doing in the American Flag Snack Tray

- Blueberries — These are the easiest way to create a dense, clearly defined canton. Fresh berries hold their shape best; if they’re wet, dry them well so they don’t slide around and stain the white ingredients nearby.
- Strawberries — Halved berries give you a clean red stripe with enough surface area to read from above. If yours are very large, quarter them so the stripes sit flatter and don’t buckle the board.
- White cheddar or mozzarella — Cheese cubes carry the white stripes and add the creamy, salty bite that keeps this from feeling like a fruit tray. Cheddar gives more flavor; mozzarella looks especially clean and neat, so use it when the visual design matters most.
- Pepperoni — This adds the second red stripe and gives the tray some savory weight. Folding the slices in half helps them stand up a little and keeps the stripe from looking flat.
- White cheddar crackers or Ritz crackers — Crackers help fill space without making the board feel heavy. Ritz bring butteriness, while a sharper cheddar cracker pulls more flavor into the white stripe.
- Pretzel sticks — These are optional, but they’re useful when you need straight edges or want to keep stripes visually separated. They also add crunch without competing with the flag colors.
- Cream cheese or ranch dip — A small dip bowl gives people something to spread or dunk, which makes the tray feel more complete. Keep it in one corner so it doesn’t interrupt the flag pattern.
Building the Flag from the Corners Out
Set the canton first
Start with the blueberries in the upper-left corner and pack them in tightly. That corner sets the scale for everything else, so don’t scatter them loosely across the tray. If the berries roll, use the flat side of a spoon or your fingers to nudge them into a clean rectangle. The goal is a solid block of blue with almost no gaps showing through.
Lay the stripes in clean bands
Work across the tray with alternating red and white rows, keeping each band similar in height. Strawberries and pepperoni can share the red stripes, while cheese cubes and crackers handle the white ones. If one row starts to drift, press it back into line before moving on. The board looks best when every stripe runs straight from edge to edge.
Finish with the border details
Use pretzel sticks to sharpen any stripe that looks fuzzy or uneven. They’re especially handy at the ends of rows where round berries and irregular crackers can make the edge look messy. Add the dip bowl last so you don’t have to work around it while arranging the pattern. A few rosemary sprigs at the edges give the tray a finished look without stealing attention from the flag.
How to Adapt the Tray for Different Crowds and Diets
Gluten-Free Flag Tray
Swap in gluten-free crackers and make sure your pepperoni and dip are certified gluten-free. You’ll keep the same bold look, but the tray becomes safe for guests who need to avoid wheat. The crunch stays important here, so choose crackers that can hold their shape on the board.
Vegetarian Version
Leave out the pepperoni and replace that red stripe with extra strawberries, red grapes, or even cherry tomatoes if you want more savory balance. The board will look a little sweeter, so the dip and cheese matter more for contrast. This version works best when the red fruit is packed just as tightly as the original.
Make It Ahead Without Losing the Pattern
You can wash and dry the berries, cube the cheese, and fold the pepperoni a few hours ahead. Keep everything chilled and assemble the board as close to serving as possible so the crackers stay crisp and the fruit doesn’t leak onto the cheese. If you need a little extra time, build the flag without the crackers and add those at the last minute.
Bigger Party, Bigger Board
Double the ingredients and move to a sheet pan or extra-large tray if you’re serving a crowd. Keep the same proportions so the flag still reads clearly from above, which matters more than filling every inch of space. A larger board needs more contrast, not just more food.
Storage and Holding
- Refrigerator: Store the ingredients separately for up to 2 days. Once assembled, the tray is best served right away because the crackers soften and the berries release moisture.
- Freezer: Don’t freeze this tray. The berries turn mushy, the cheese changes texture, and the crackers lose their crunch completely.
- Reheating: Not needed. If you’ve chilled the ingredients, let the board sit at room temperature for 10 to 15 minutes before serving so the cheese tastes better and the flavors open up.
Answers to the Questions Worth Asking
American Flag Snack Tray
Ingredients
Equipment
Method
- Set a large rectangular wooden board, sheet pan, or serving tray on a flat surface so you can assemble an even grid of stripes. Arrange ingredients within reach for faster placement.
- In the upper left corner, fill a rectangle densely with blueberries to form the canton. Press them lightly so the blue area looks packed and clearly defined.
- Create the red stripes by arranging rows of halved strawberries and folded pepperoni slices across the length of the board. Keep rows straight and evenly spaced for clean, color-blocked stripes.
- Fill in the white stripes with rows of white cheddar cubes and crackers alternating between the red rows. Place them in a tight rhythm so each white stripe looks continuous.
- Use pretzel sticks to define the stripe borders if needed for clean lines. Place them along the edges where you want crisp separation between colors.
- Place a small bowl of cream cheese or ranch dip in one corner of the tray. Add a little space around the bowl so the center rows stay neat.
- Tuck rosemary sprigs at the edges of the board and serve immediately. Scatter lightly so the garnish frames the flag without covering the stripes.