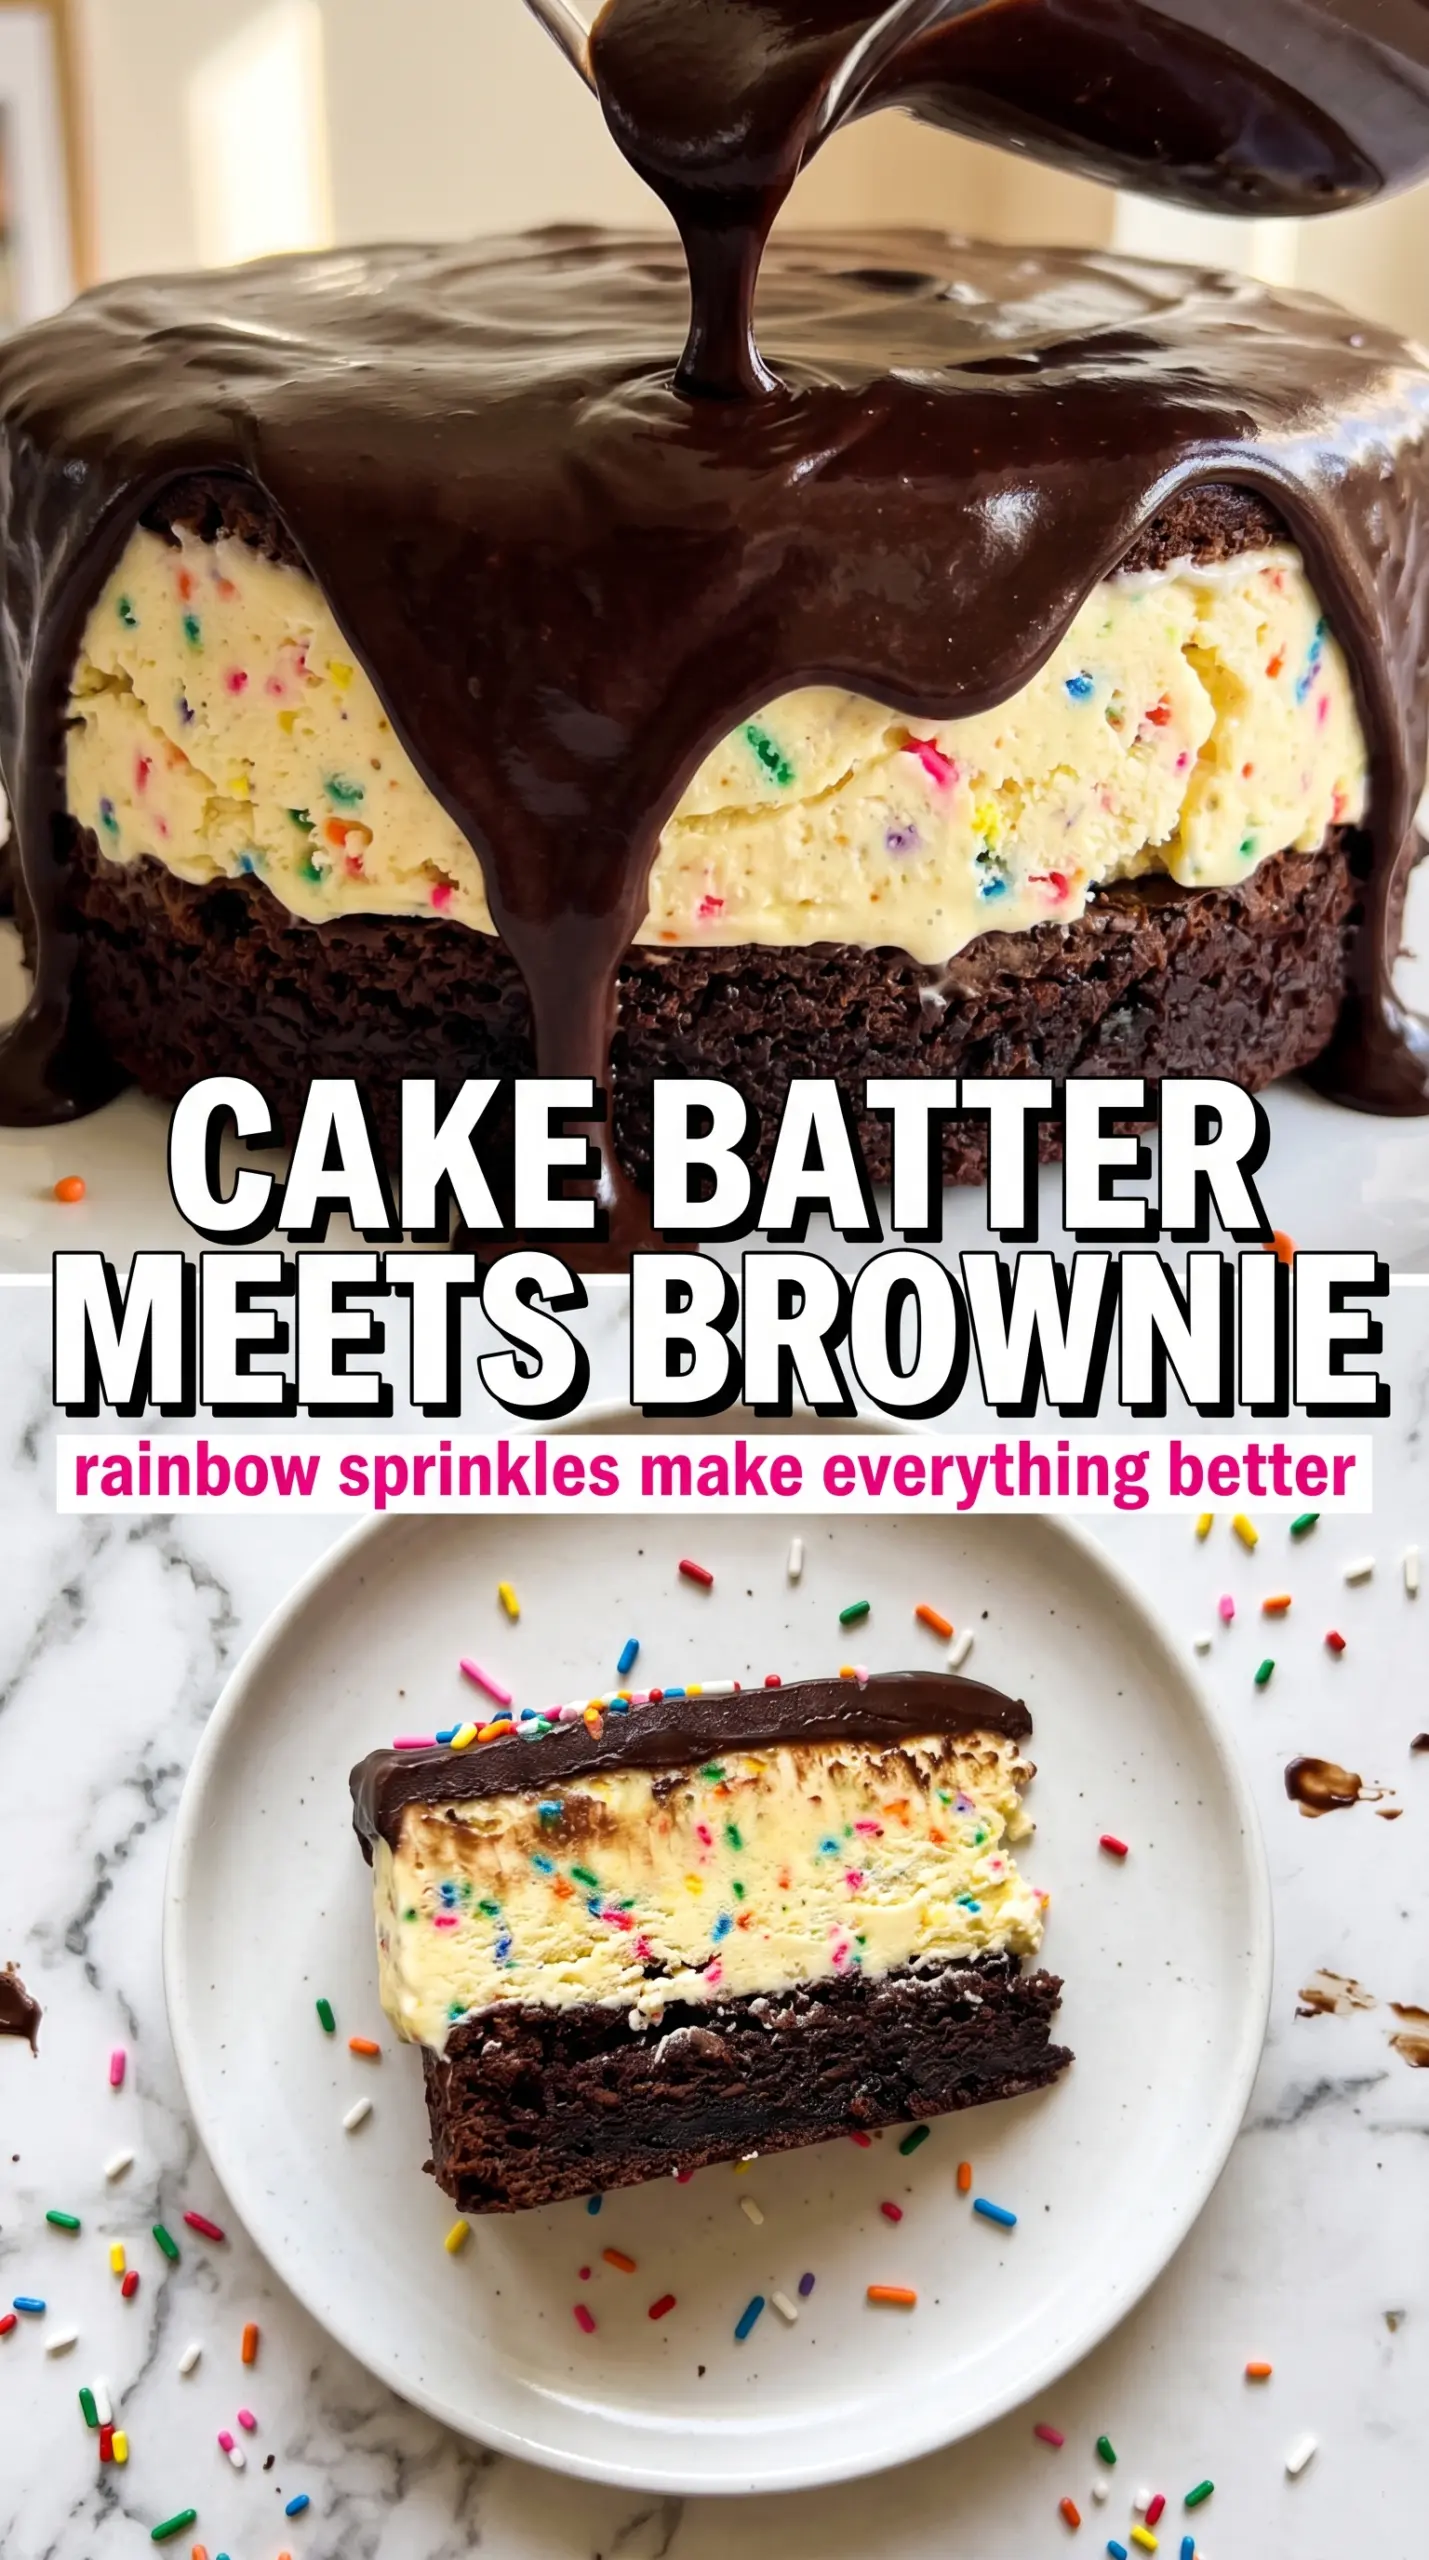
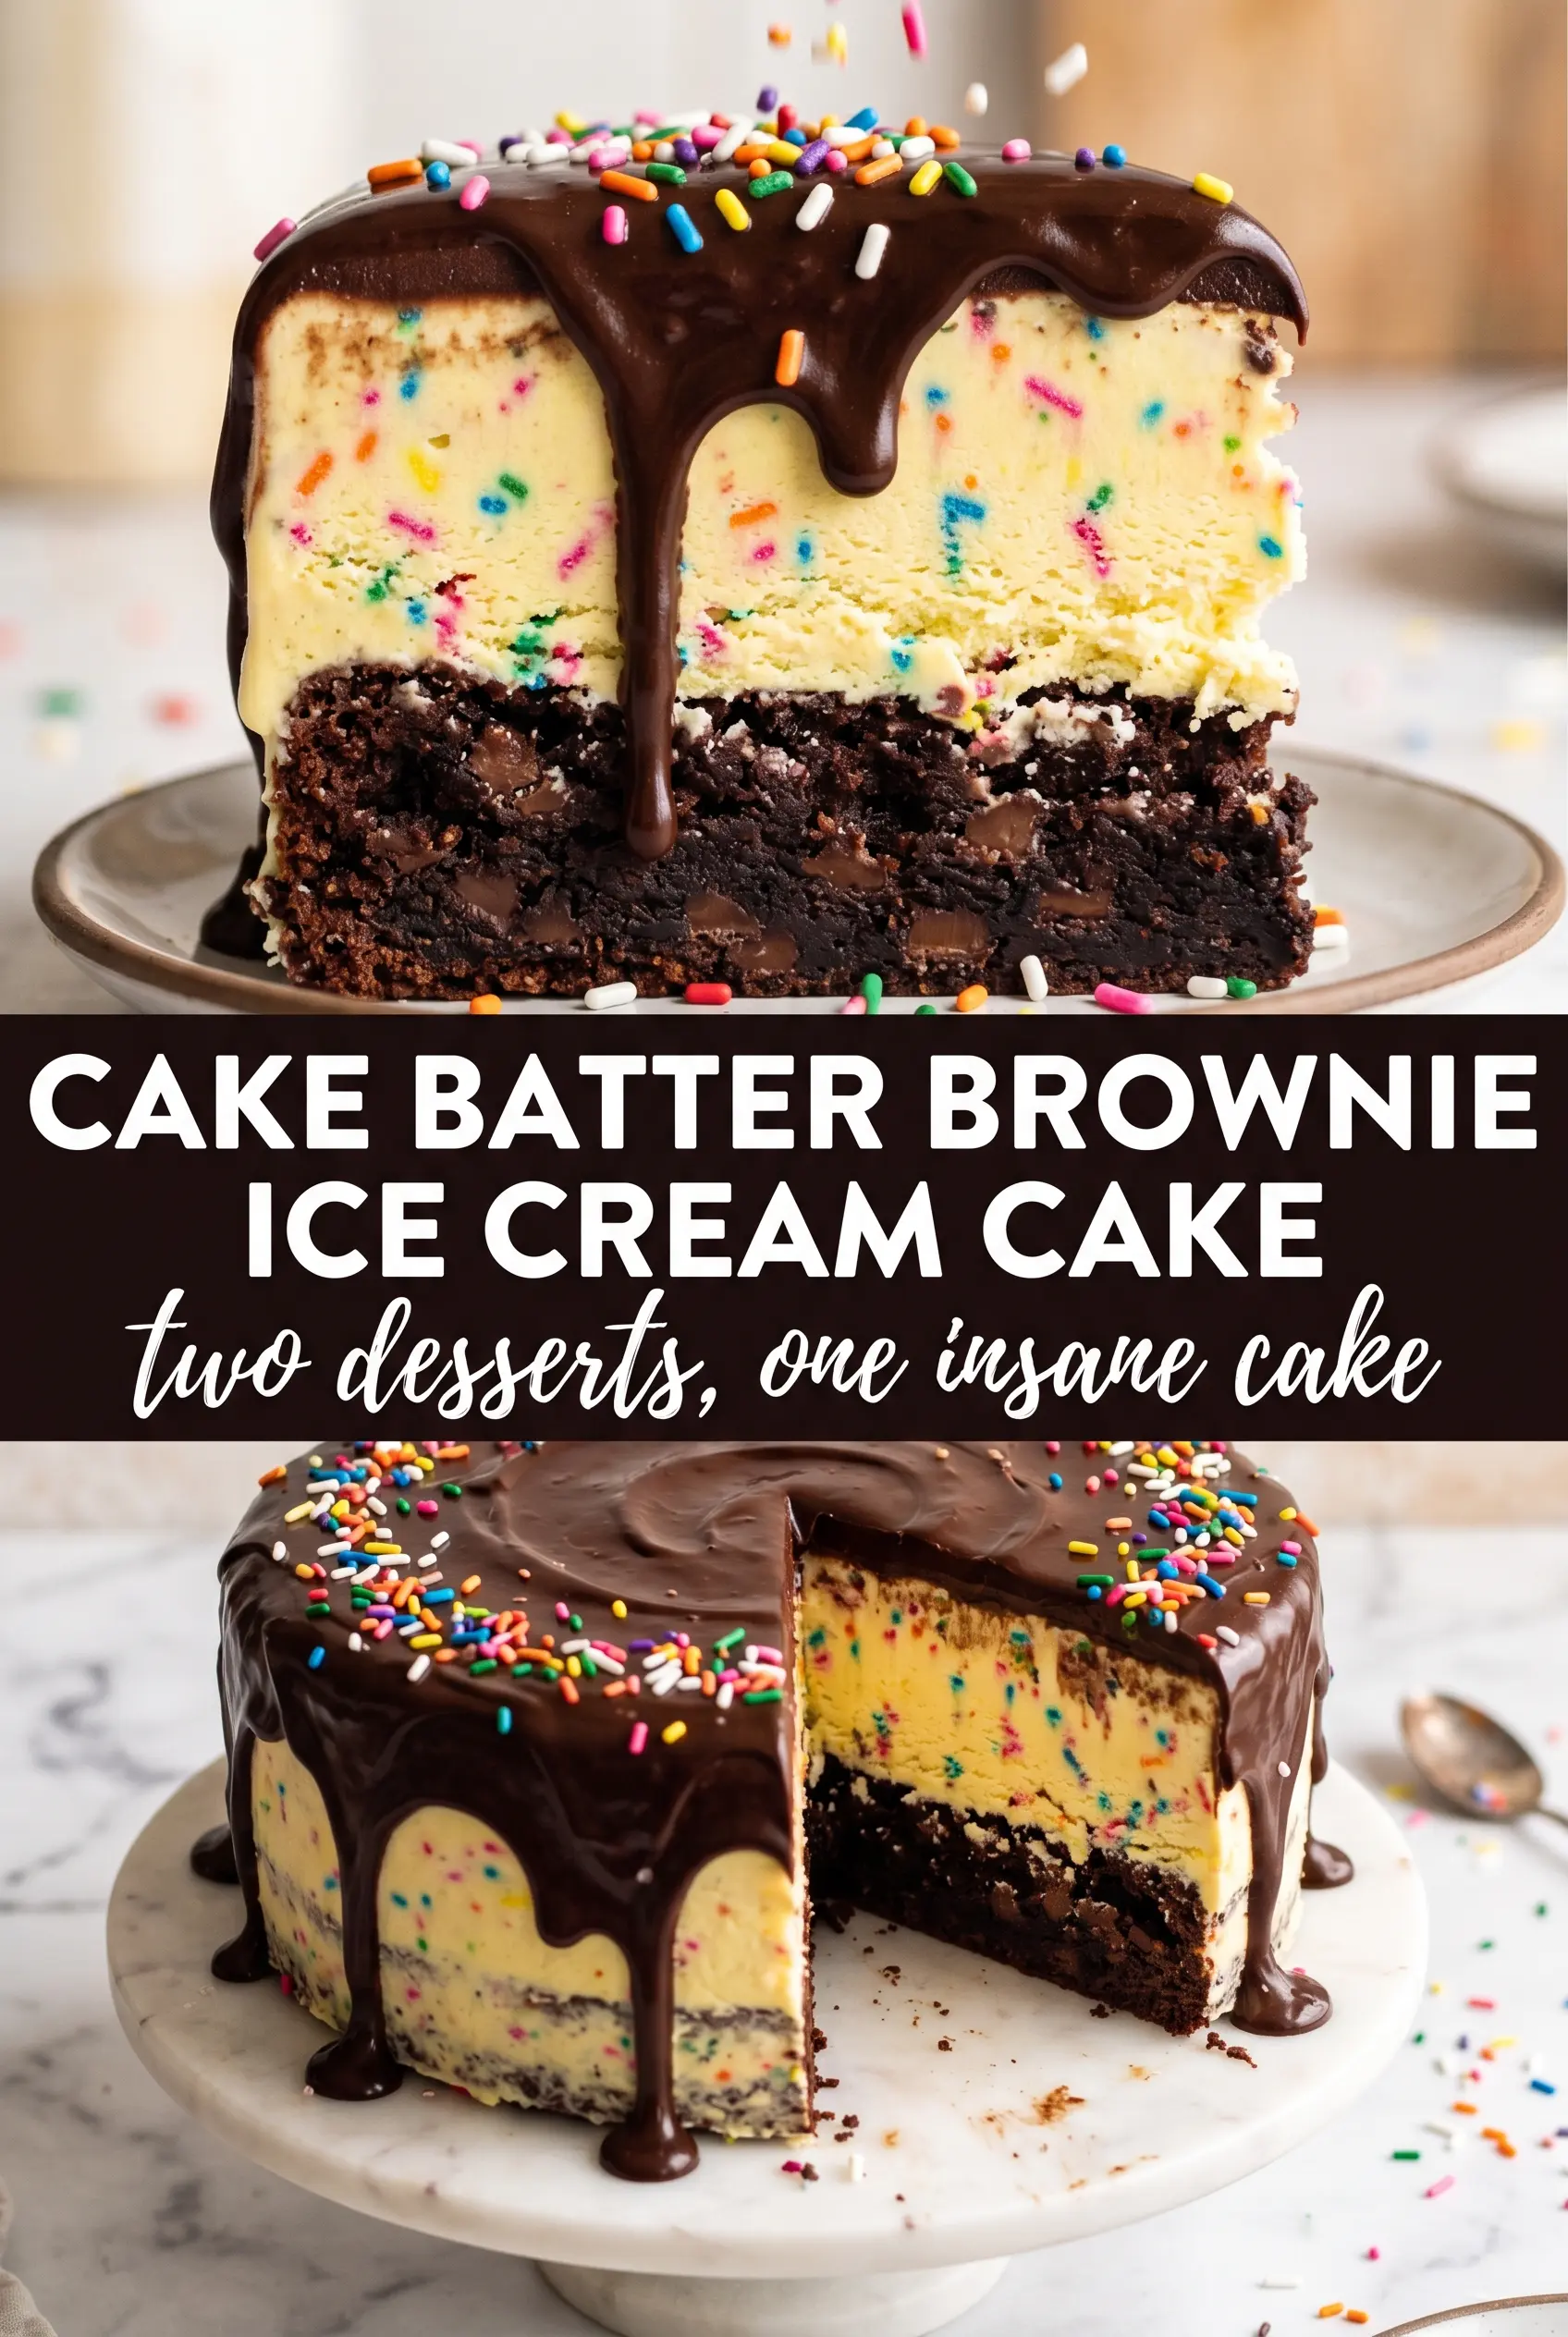
Fudgy brownie, cake batter ice cream, hot fudge, and a blizzard of rainbow sprinkles turn this into the kind of frozen dessert that disappears before the candles are done. The brownie base stays dense and chewy under the cold ice cream, so every slice cuts with contrast instead of turning into a one-note sugar bomb. The fudge ribbon keeps the middle from tasting flat, and the whipped topping on top softens all that richness just enough to make another bite feel necessary.
The trick is giving each layer enough time to set before the next one goes on. A brownie that’s even slightly warm will melt the ice cream at the edges and you’ll lose that clean, layered look when it freezes. Softened ice cream spreads easily, but it should still be cold enough to hold its shape once it hits the pan. That’s how you get distinct layers instead of a muddy swirl.
Below you’ll find the small details that keep this cake from turning icy or sloppy, plus the best way to slice it so the sprinkles stay put and the brownie base doesn’t crack.
The brownie stayed chewy even after freezing, and the fudge layer cut through the sweet ice cream in the best way. I let it sit for 10 minutes before slicing and the pieces came out clean with all the sprinkles still on top.
Love the brownie base and rainbow sprinkle layers? Save this cake batter fudge brownie ice cream cake for the next birthday that needs a frozen showpiece.
The Freeze Time That Keeps the Layers Clean
The biggest mistake with an ice cream cake like this is rushing the freezer. If the brownie layer isn’t fully cold, the ice cream softens at the edges and slides when you add the fudge. If the first freeze is too short, the top layer never sets into a clean slab, and the whipped topping sinks into the fudge instead of sitting on top.
This dessert needs two separate freezes for a reason. The first one firms up the ice cream over the brownie so you can drizzle and swirl without tearing the layer underneath. The second one gives the finished cake enough structure to cut into neat squares instead of collapsing into a puddle the moment it leaves the pan.
What Each Ingredient Is Actually Doing in This Ice Cream Cake
- Base layer (cookies, cake, or graham cracker) — This provides structure and stability. Crushed and mixed with butter creates a firm foundation.
- Ice cream (the main star) — Use quality ice cream or make homemade. Softness matters for layering.
- Sauce or topping between layers (fudge, caramel, or fruit) — This adds moisture, flavor, and prevents dryness. Don’t skip this layer.
- Frosting or whipped cream (optional outer layer) — This prevents freezer burn and adds creaminess. Stabilized whipped cream works best.
- Freezing time (at least 4-6 hours) — This sets the layers so cake slices cleanly. Longer freezing prevents melting during serving.
- Room temperature before serving (5-10 minutes) — This softens the cake slightly for better texture. Serve immediately after thawing.
- Toppings (chocolate, nuts, cookies, or sprinkles) — These add visual appeal and texture. Add right before serving.
- Storage (in freezer at 0°F or below) — This prevents ice crystal formation and maintains quality. Cover with plastic wrap.
What Each Layer Is Actually Doing Here
- Brownie mix — A boxed brownie mix is perfect here because you want a dense, reliable base that bakes up chewy and sturdy. A cakier brownie won’t hold up as well once the ice cream goes on top.
- Cake batter or birthday cake ice cream — This is the main flavor, so quality matters more than with the brownie mix. Soften it just enough to spread, but don’t let it melt into a soup or you’ll lose the speckled, scoop-shop texture.
- Rainbow sprinkles — Stir them into the ice cream before spreading so they’re suspended throughout the slice instead of sitting only on top. Jimmies hold their color and shape better than tiny nonpareils, which can bleed.
- Hot fudge sauce — Use a thick sauce, not a thin chocolate syrup. You want it to ribbon through the ice cream and stay visible after freezing.
- Whipped topping — This keeps the top light and easy to slice through. Homemade whipped cream can work, but it softens faster, so add it only after the first freeze and eat the cake soon after the final set.
Building the Frozen Cake Without Losing the Swirl
Start With a Fully Cooled Brownie Base
Bake the brownies in a 9×13 pan and let them cool all the way before anything else touches them. Warm brownies melt ice cream on contact, which means the edges turn slushy and the layer below the frosting gets gummy. If you’re in a hurry, slide the pan into the fridge for 30 minutes after it reaches room temperature. The base should feel completely cool to the touch and firm enough to support a thick spread on top.
Fold the Sprinkles Into the Ice Cream
Stir the rainbow sprinkles into softened cake batter ice cream just until they’re evenly dispersed. Don’t beat it hard or you’ll whip in extra air and make the texture fluffy instead of scoop-like. The ice cream should spread in thick ribbons, not pour. If it gets too soft, the sprinkles sink and you end up with a muddy middle instead of bright confetti throughout the slice.
Swirl the Fudge Before the Freeze
Spread the sprinkle ice cream over the brownie in an even layer, then drizzle the hot fudge over the top. Drag a knife through it a few times to make loose swirls, not a full mix. You want visible streaks of fudge in the frozen cake, and over-swirling blends everything into one brown layer. Once that’s in place, freeze the cake until it’s completely firm before adding the whipped topping.
Finish With the Topping and the Last Freeze
Spread the whipped topping over the frozen surface in a smooth layer, then shower it generously with more rainbow sprinkles. Freeze again until the whole cake is solid enough to slice cleanly, at least 2 more hours. If you cut too soon, the topping will smear and the bottom layer will drag. Let the cake sit at room temperature for 5 to 10 minutes before slicing so the knife can glide through the brownie instead of cracking it.
How to Adapt This Birthday Cake Ice Cream Cake for Different Crowds
Make it dairy-free
Use a dairy-free brownie mix, dairy-free birthday cake ice cream, and a coconut-based whipped topping. The texture stays close, but the flavor will lean a little more coconut if that’s the base of your substitute topping. Keep the freezing time the same so the layers set firmly.
Use homemade brownies instead of box mix
A homemade brownie works well if it bakes up fudgy and not cakey. Keep the pan size at 9×13 and cool it completely before layering so the structure stays sturdy under the ice cream. Skip anything too delicate or ultra-gooey, or the cake won’t slice cleanly after freezing.
Swap the cake batter ice cream for vanilla
Vanilla ice cream gives you a less birthday-cake-forward dessert, but the brownie and fudge still carry the show. Add a little extra vanilla extract to the melted ice cream if you want the flavor to feel more like cake batter. You’ll lose some of the nostalgic mix-in flavor, but the texture stays just as creamy.
Storage and Reheating
- Refrigerator: Don’t store this in the fridge. It will melt and lose its layered shape within minutes.
- Freezer: Wrap the pan tightly in plastic wrap and then foil. It keeps well for up to 1 week, though the sprinkles can soften a little after a few days.
- Reheating: No reheating needed. Let slices stand at room temperature for 5 to 10 minutes before serving so the brownie base cuts cleanly and the ice cream isn’t rock-hard.
Answers to the Questions Worth Asking
Cake Batter Fudge Brownie Ice Cream Cake
Ingredients
Equipment
Method
- Bake the brownie mix in a 9x13 pan according to package directions until set and fudgy in the center, about 30 minutes. Cool completely before assembling.
- Soften the cake batter or birthday cake ice cream until spreadable, then fold in the 1/2 cup rainbow sprinkles. Mix until the sprinkles are evenly distributed throughout.
- Spread the sprinkle ice cream over the cooled brownies in a thick, even layer. Press gently to level so the cake slices cleanly later.
- Drizzle the 1 cup hot fudge sauce over the top and swirl with a knife to form a ribbon effect. Make sure some swirls reach the edges.
- Freeze for 6 hours until completely firm. Check firmness by gently tapping the pan; the top should not jiggle.
- Cover the firm brownie-ice cream layer with the whipped topping. Spread to the edges in an even blanket.
- Shower generously with more rainbow sprinkles for decoration. Add extra if you want a dense sprinkle look.
- Freeze for 2 more hours before slicing. Slice with a warm knife for cleaner edges.