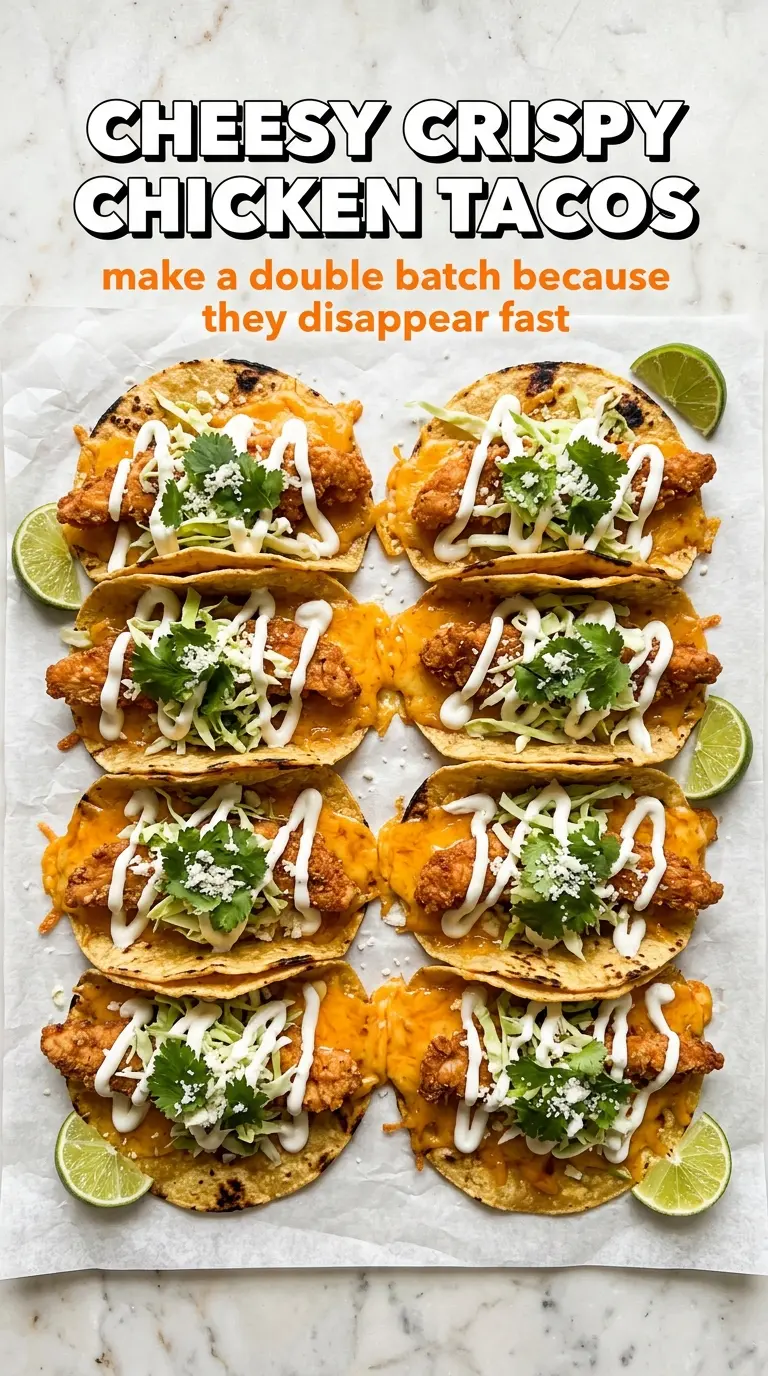
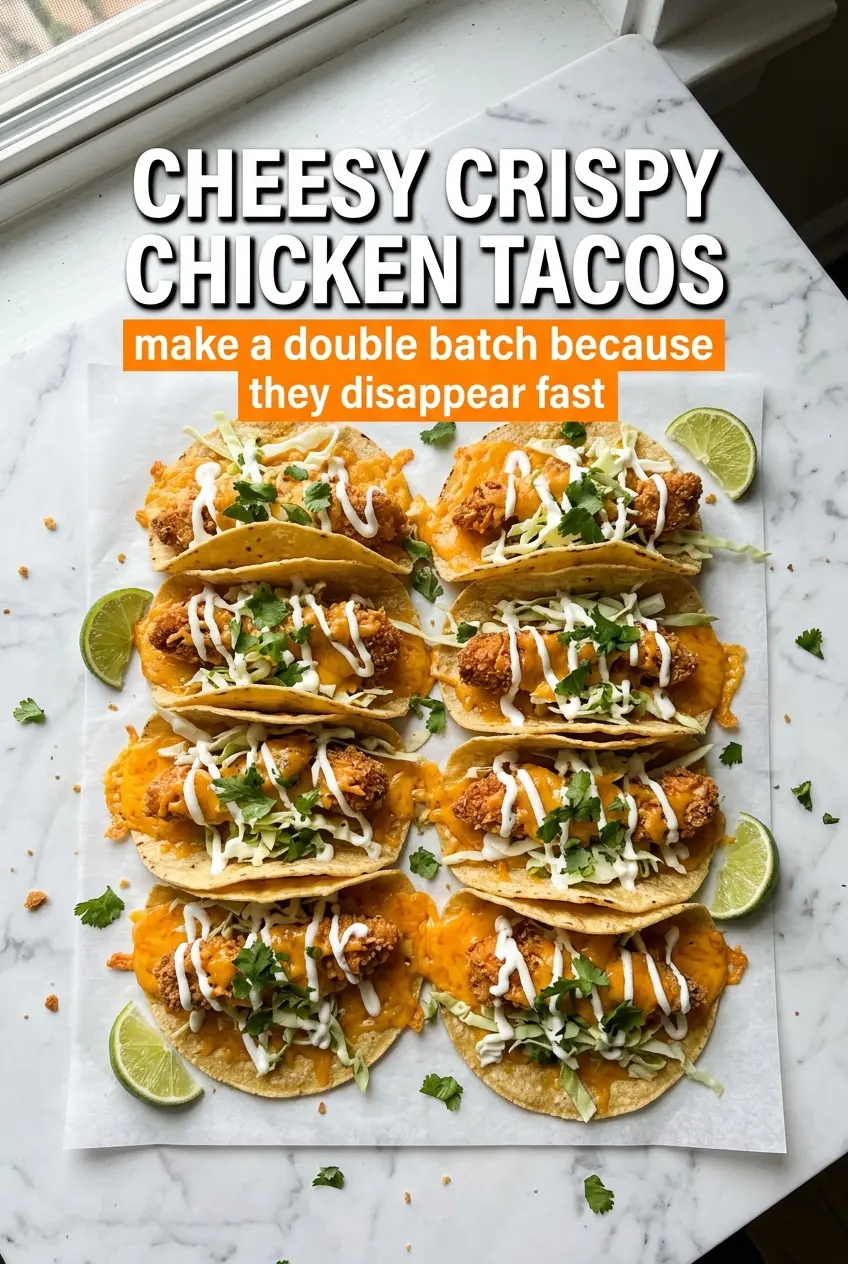
Crispy chicken tacos hit a sweet spot that never gets old: shatteringly browned chicken, stretchy melted cheese, and warm tortillas that hold just enough filling without falling apart. The best version is all about contrast. The chicken stays crunchy, the cheese melts into the gaps, and the fresh lettuce and lime keep each bite from feeling heavy.
What makes these tacos work is the two-stage cheese move. A little cheese goes under the chicken so it melts into the tortilla, then more goes on top so everything seals together in the skillet. The chicken is fried in small batches, which keeps the oil hot and the coating crisp instead of greasy. If the oil drops too much, the breading turns dull fast, so patience pays off here.
Below, you’ll find the small details that make these tacos worth repeating, from keeping the crust crisp after frying to the easiest way to get the cheese perfectly molten right before serving.
The chicken stayed crunchy even after I tucked it into the tortillas, and the cheese melted into this gooey layer that held everything together. My husband grabbed a third taco before I even sat down.
Crispy Chicken Tacos with melted cheese are perfect for busy nights when you want something crunchy, gooey, and worth the skillet step.
The Crisp Coating Has to Survive the Skillet
The biggest mistake with fried chicken tacos is treating the fry like the finish line. It isn’t. The coating has to stay crunchy long enough to survive the warm tortillas, the cheese, and the final quick skillet press. That means a dry flour dredge, hot oil, and chicken pieces that aren’t crowded in the pan.
If the oil temperature sinks, the flour drinks up grease instead of crisping. You end up with pale, soft chicken that turns limp the second it meets steam. Frying in batches keeps the oil at a steady 350°F, which gives you that deep golden crust and a cleaner, lighter bite.
What Each Ingredient Is Doing in These Tacos
- Boneless chicken breasts — These cook quickly and stay easy to bite through once cut into small pieces. Thighs can work if that’s what you have, but breasts give you a cleaner, lighter taco filling and fry up a little neater.
- All-purpose flour — This is what builds the crust. A gluten-free all-purpose blend can work here, but skip anything too coarse or gritty because the coating won’t seal as smoothly.
- Garlic powder and chili powder — They season the crust from the outside in, so every bite tastes complete even before the toppings go on. Fresh garlic won’t work the same way here because it can burn in the hot oil.
- Eggs — They act as the glue between the chicken and the flour. If the coating looks patchy, it usually means the egg layer was too thin or the chicken wasn’t fully pressed into the flour.
- Oaxaca or mozzarella cheese — This is the stretch factor. Oaxaca melts with the best pull, while mozzarella gives you a similar result if that’s easier to find. Pre-shredded cheese works in a pinch, but freshly shredded melts smoother and faster.
- Corn tortillas — They bring a little chew and a toasty corn flavor that balances the fried chicken. Warm them first so they fold instead of cracking, especially if they’re on the dry side.
- Lettuce, onion, cilantro, and lime — These are the freshness layer. They don’t replace the richness; they cut through it. Lime at the end matters most, because that hit of acid wakes up the fried coating and keeps the taco from tasting flat.
Frying, Melting, and Folding Without Losing the Crunch
Coating the Chicken Evenly
Cut the chicken into bite-sized pieces so each one cooks through before the breading overbrowns. Season them first, then dredge in the flour mixture after the egg, pressing lightly so the coating clings in an even layer. If you see bare spots, the chicken was too wet or the flour wasn’t packed on well enough, and those spots will fry up pale.
Keeping the Oil Hot
Heat the oil to 350°F and keep an eye on it between batches. A thermometer is worth using here because the difference between crisp chicken and greasy chicken is often just a few degrees. The pieces should sizzle immediately when they hit the oil and turn a deep golden color in about 6 to 8 minutes total.
Building the Taco Shell
Warm the tortillas before filling them, then add a small layer of cheese to the center. Top with the fried chicken, add a little more cheese, and fold them in half. That second layer of cheese is what helps the tacos hold together once they hit the skillet.
Melting the Cheese in the Skillet
Work in a hot skillet for just 1 to 2 minutes per side, long enough to melt the cheese and lightly toast the tortilla. Don’t leave them in too long or the tortilla will stiffen before the cheese fully loosens. You’re looking for the cheese to go glossy and stretchy while the outside stays crisp at the edges.
Make Them Spicier Without Changing the Texture
Add a pinch of cayenne to the flour or dust the fried chicken with chili powder right after it comes out of the oil. That gives you more heat without changing the crust, which is the part that falls apart first when people start overloading the seasoning.
Gluten-Free Version That Still Fries Well
Use a gluten-free all-purpose flour blend with a neutral texture and check that your corn tortillas are certified gluten-free. The crust will be a touch more delicate than the wheat version, so let the chicken drain a minute before moving it around.
Lighter Cheese Swap
Low-moisture mozzarella gives you the same melt with a slightly milder flavor, which is useful if you want the chicken and lime to stand out more. Don’t use a hard aging cheese here; it won’t melt into the filling the way you need.
Storage and Reheating
- Refrigerator: Store the fried chicken separately from the tortillas and toppings for up to 3 days. The coating softens a bit in the fridge, but it still reheats well if you crisp it back up.
- Freezer: The fried chicken freezes better than the assembled tacos. Freeze the cooled pieces on a tray, then transfer to a bag for up to 2 months; don’t freeze the tacos assembled, because the tortillas and lettuce won’t recover.
- Reheating: Reheat the chicken in a hot oven or air fryer until the crust is crisp and the center is hot. Skip the microwave if you want any crunch left, because it turns the coating soft and steamy fast.
Questions I Get Asked About This Recipe
Cheesy Crispy Chicken Tacos
Ingredients
Equipment
Method
- Cut the boneless chicken breasts into bite-sized pieces and season with salt and pepper.
- In a shallow dish, combine the all-purpose flour, garlic powder, and chili powder.
- Dip the seasoned chicken pieces in the beaten eggs, then dredge in the seasoned flour until coated.
- Heat the vegetable oil to 350°F in a Dutch oven.
- Fry the chicken in batches until golden and cooked through, about 6-8 minutes total, then drain on paper towels.
- Warm the corn tortillas and place a small portion of Oaxaca or mozzarella cheese in the center of each.
- Add the fried chicken on top, then add more Oaxaca or mozzarella cheese; fold tortillas in half.
- Briefly warm the filled tortillas in a hot cast iron skillet to melt the cheese, about 1-2 minutes per side, until gooey and lightly crisp at the edges.
- Top with shredded lettuce, diced onion, and cilantro, then serve with lime wedges.