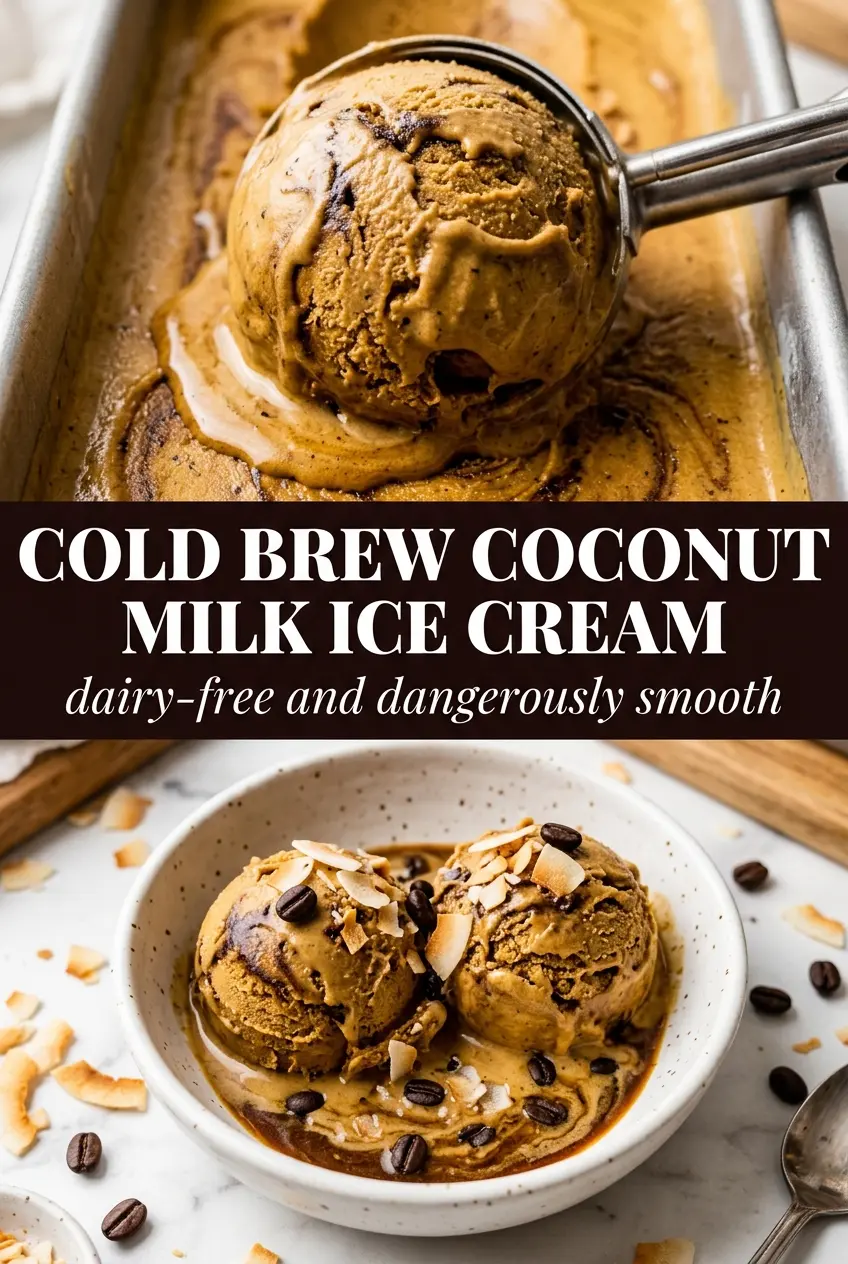
Cold brew coffee and coconut milk ice cream hits that sweet spot between bold and silky. The coffee comes through deep and roasty, not thin or watery, and the coconut milk gives it a plush body that freezes into a scoop with real character instead of an icy block. It tastes like coffeehouse dessert with a cleaner finish, the kind you keep going back to with a small spoon after dinner.
What makes this version work is the balance of fat, sugar, and a small amount of starch. Full-fat coconut milk gives the base enough richness to churn smoothly, while the arrowroot or cornstarch helps the mixture thicken just enough on the stove so it freezes with a creamier texture. The cold brew concentrate brings the flavor without the bitterness you can get from brewing coffee directly into cream.
Below you’ll find the small details that matter here: how to keep the base from tasting flat, why chilling is non-negotiable, and what to do if you want an even stronger coffee kick at serving time.
The coffee flavor stayed bold after freezing, and the coconut milk made it scoop like a dream instead of turning icy. I served it with a little extra cold brew drizzle and everyone kept asking what gave it that rich finish.
Save this cold brew coffee and coconut milk ice cream for the days when you want a bold, dairy-free scoop with a velvety finish.
The Step People Skip That Keeps This Ice Cream From Turning Icy
The fast way to ruin a dairy-free ice cream base is to treat chilling like an optional pause. It isn’t. Coconut milk needs time in the fridge for the fat to firm up and for the whole mixture to relax before it goes into the churner. If you churn it warm, the texture stays loose and the freezer has to do too much of the work, which is how you end up with grainy edges and a hard center.
The other key move is the gentle stovetop thickening. You are not cooking a custard here. You only want the mixture to warm enough for the sugar to dissolve and the starch to take the edge off the liquid. Once it coats a spoon lightly, stop. Push it much farther and the coconut flavor can taste cooked instead of clean.
- Full-fat coconut milk — This is the base that gives the ice cream its body. Light coconut milk won’t carry enough fat, and the finished scoop will freeze harder and taste flatter.
- Cold brew coffee concentrate — Use concentrate, not regular brewed coffee, or the coffee flavor gets washed out after freezing. If yours is especially strong, pull back by a tablespoon or two so it doesn’t dominate the coconut.
- Arrowroot or cornstarch — Either one helps the base thicken just enough before churning. Arrowroot gives a slightly silkier finish, while cornstarch is the easiest pantry swap and works well here.
- Maple syrup in place of sugar — This swap brings a deeper, more rounded sweetness and fits the dairy-free profile naturally. Use the same amount, but expect a faint maple note in the final scoop.
What Each Ingredient Is Actually Doing in This Ice Cream

- Base ingredient (cream, milk, or custard) — This provides the foundation and richness. Quality matters.
- Sweetener (sugar, honey, or condensed milk) — This sweetens and prevents ice crystals. The ratio is critical.
- Flavor element (vanilla, fruit, chocolate, coffee, or other) — This defines the ice cream personality. Use quality ingredients.
- Egg yolks (if making custard base) — These create richness and silky texture. Optional but elevates ice cream.
- Churning (if using ice cream maker) — This incorporates air and prevents ice crystals. Critical for smooth texture.
- Freezing temperature and time — Proper freezing prevents rock-hard texture. Store at 0°F or below.
- Mix-ins (chocolate, cookies, fruit, or swirls) — These add texture and prevent one-dimensional flavor. Add near end of churning.
- Serving temperature (slightly soft, not rock hard) — This provides creamy mouthfeel. Remove from freezer 5 minutes before serving.
How to Build the Base So It Churns Smoothly
Whisking the Base Together
Start with a saucepan and whisk the coconut milk, cold brew concentrate, sugar, starch, vanilla, and salt until the mixture looks fully combined and no dry starch is clinging to the bottom. The sugar won’t be dissolved yet, and that’s fine. What matters is an even mixture before heat goes on, because starch can clump if it hits the pan unevenly.
Heating Until It Lightly Thickens
Set the pan over medium heat and whisk constantly as it warms. After about five minutes, the mixture should look glossy and slightly thicker, with steam rising and the sugar fully gone. If it starts to bubble hard, the heat is too high. Pull it back; aggressive heat doesn’t improve the texture and can make the coconut milk separate at the edges.
Cooling Before the Freeze
Pour the base into a bowl set over an ice bath and stir until it stops steaming, then refrigerate it until fully cold. This is the part that sets up the churn. A warm base will sabotage the texture no matter how good your machine is, and the extra chill time helps the coffee flavor settle in instead of tasting sharp.
Churning and Hardening
Churn according to your machine’s instructions until the mixture looks like soft serve and holds distinct ridges from the paddle. It should be thick but still spoonable. Transfer it to a freezer container, press parchment or plastic wrap against the surface, and freeze until scoopable. If it freezes rock hard, it just needs a few minutes on the counter before serving, not a second round of machine churning.
Espresso-Forward Version
Swap in half cold brew concentrate and half chilled espresso if you want a sharper coffee edge. The flavor gets deeper and a little more bittersweet, which plays well with the coconut milk, but don’t use hot espresso or you’ll warm the base and undo the chilling work.
Maple-Sweetened Dairy-Free Version
Use maple syrup instead of granulated sugar for a softer sweetness and a slightly more complex finish. It keeps the recipe fully dairy-free and vegan, though the maple note will sit quietly behind the coffee rather than disappearing completely.
Low-Sugar Option
You can reduce the sugar a little, but don’t cut it too far. Sugar keeps the ice cream softer in the freezer and helps the coffee taste fuller. If you go lower, expect a firmer scoop that needs more resting time before serving.
Storage and Reheating
- Refrigerator: Keep the cooked base covered for up to 2 days before churning. It will thicken slightly as it chills.
- Freezer: Store the churned ice cream in an airtight container for up to 2 weeks. After that, the texture can start to dry out around the edges.
- Reheating: Ice cream doesn’t need reheating, but it does need a brief soften-before-serving window. Let it sit at room temperature for 5 to 10 minutes so the coffee flavor opens up and the scoop doesn’t crack the surface.
Questions I Get Asked About This Recipe
Cold Brew Coffee and Coconut Milk Ice Cream
Ingredients
Equipment
Method
- Whisk full-fat coconut milk, cold brew coffee concentrate, granulated sugar or maple syrup, arrowroot or cornstarch, vanilla extract, and salt together in a saucepan until smooth.
- Heat over medium heat, whisking constantly, until the mixture thickens slightly and the sugar dissolves, about 5 minutes.
- Cool completely over an ice bath, stirring occasionally so the base chills evenly.
- Refrigerate at least 4 hours until cold through, then churn.
- Churn the chilled mixture in an ice cream maker according to the manufacturer’s instructions until it reaches a soft-serve consistency.
- Freeze until scoopable, then serve with an extra drizzle of cold brew coffee concentrate.