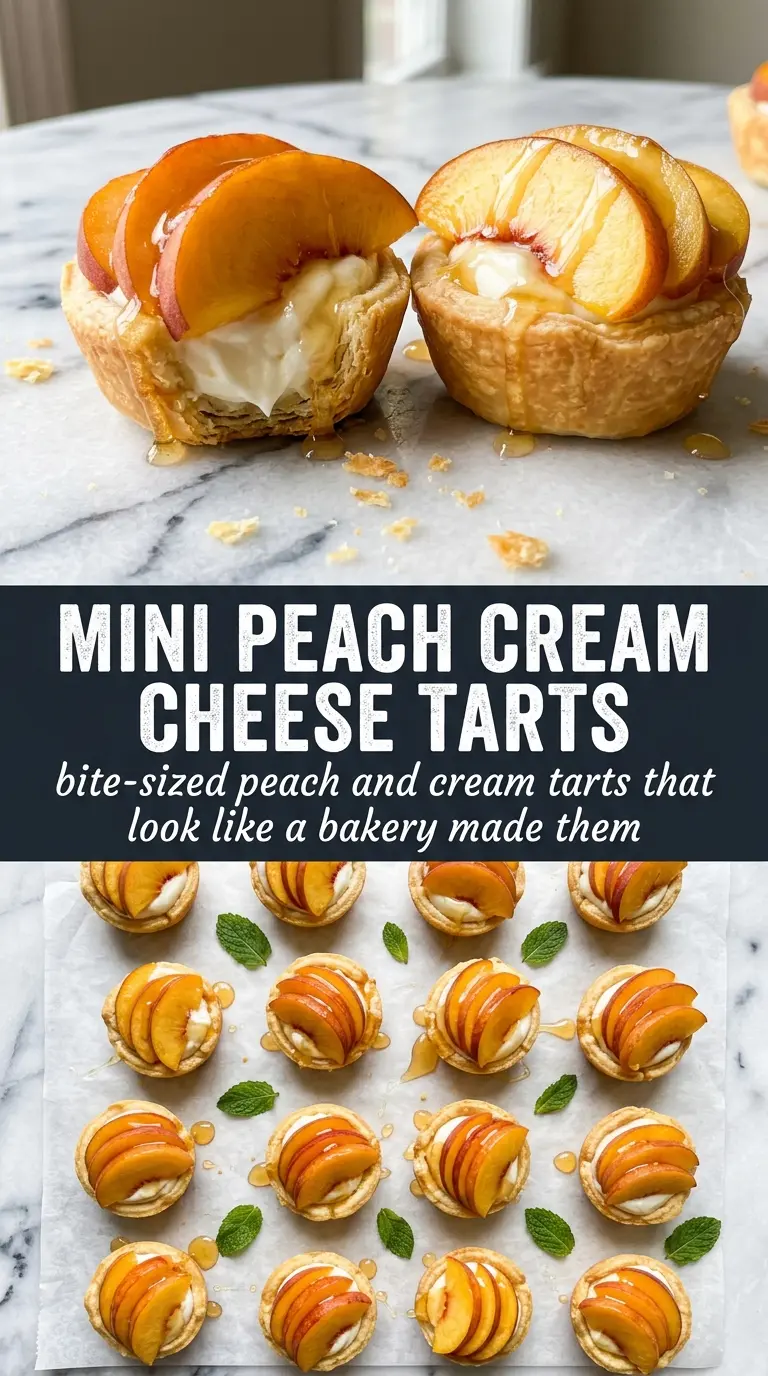
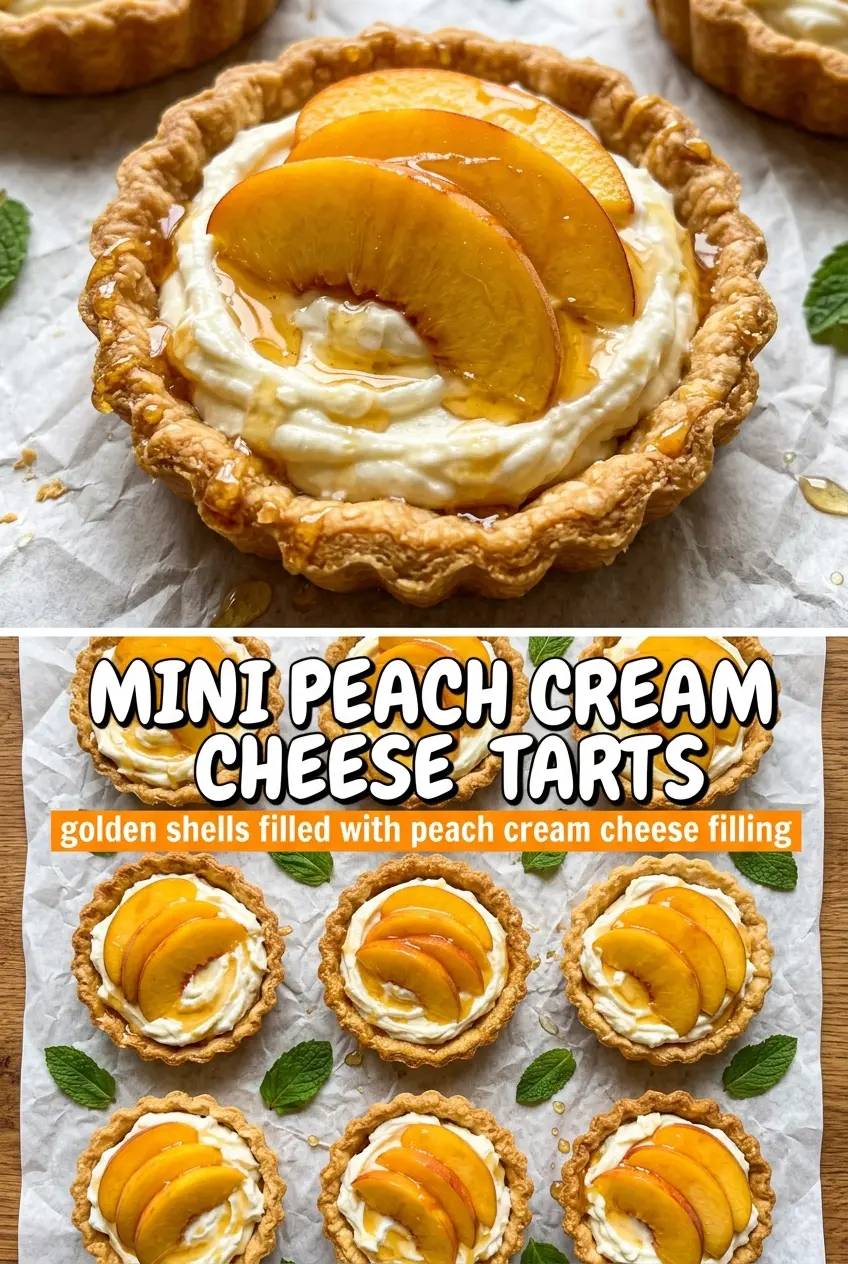
Tiny tart shells, cool vanilla cream cheese, and juicy peach slices make these mini peach cream cheese tarts the kind of dessert people reach for twice. They look polished on a tray, but they come together fast, and the texture is what keeps them on repeat: crisp shell, smooth filling, soft fruit, and a glossy finish that sets just enough to hold everything in place.
The key is starting with a fully cooled tart shell and a whipped filling that’s smooth enough to pipe cleanly. Softened cream cheese matters here. If it’s even a little cold, you’ll end up with little lumps that never fully disappear. The lemon zest sharpens the sweetness and keeps the filling from tasting flat, while the warm jam glaze gives the peaches shine without drowning them.
Below, I’ve included the little details that make these tarts hold up for a party, plus the best way to swap the fruit if your peaches aren’t at their peak. The chilling time matters more than it looks, and it’s the difference between a tidy tart and one that slides around on the platter.
The shells stayed crisp even after chilling, and the peach glaze gave them that bakery look. I piped the filling with a zip-top bag and it made assembly so much easier.
Save these mini peach cream cheese tarts for the kind of dessert that looks elegant with almost no fuss.
The Trick to Keeping Mini Phyllo Shells Crisp Under the Filling
Mini phyllo shells can go from crisp to soggy faster than most people expect, and the filling is usually the reason. The cure is simple: bake the shells long enough to dry them out a little, then cool them completely before adding anything creamy. A warm shell traps steam, and steam is what softens that delicate layers-and-butter texture you paid for.
This recipe also works because the filling is thick, not loose. Whipped cream cheese holds its shape in the shell, and the peach topping sits on top instead of sinking in. The final chill gives the glaze time to set, which helps the tarts look neat when you move them from the tray to a plate.
- Crisp mini phyllo shells — Bake them until they look lightly toasted at the edges, not pale and soft. That extra minute or two gives you a better base for the cream filling.
- Softened cream cheese — This needs to be fully room temperature so it beats smooth. Cold cream cheese leaves little bits behind, and those show up in the final texture.
- Ripe peaches — Use fruit that yields slightly when pressed and slice it thin. Hard peaches look pretty for about five minutes, then they taste flat and feel awkward on the tart.
- Peach jam or honey — The glaze doesn’t just add shine; it keeps the fruit looking fresh. Jam gives more peach flavor, while honey is a little cleaner and lighter.
What Each Ingredient Is Actually Doing in This Recipe
- Primary ingredient (the star) — Quality matters most. Choose the best you can find.
- Cooking medium (oil, butter, or broth) — This carries flavors and prevents dryness.
- Seasonings (salt, pepper, spices, herbs) — Layer flavors so nothing overpowers. Build depth gradually.
- Aromatics (garlic, onion, herbs) — Cook with fat to bloom flavors. Become the foundation.
- Supporting ingredients — Complement the main ingredient without overpowering it.
- Sauce or liquid (if applicable) — Brings flavors together. Balance richness with acid.
- Acid (lemon, vinegar, wine, or other) — Brightens and prevents flat-tasting results.
- Final finish (garnish, glaze, or sauce) — Prevents one-dimensional taste and adds visual appeal.
Building Each Tart So the Filling Stays Smooth and the Peaches Stay Put
Warming the Shells Just Enough
Bake the mini shells at 350°F for about 5 minutes, just until they look a shade deeper and smell lightly toasty. Let them cool all the way on the tray before you touch the filling. If you rush this part, the cream cheese softens too fast and the shells lose their snap before dessert even hits the table.
Whipping the Filling Until It Tastes Light
Beat the cream cheese with the powdered sugar, vanilla, and lemon zest until the mixture looks fluffy and spreadable with no streaks. A hand mixer works well here, and a few extra seconds matter because smooth filling pipes cleaner and tastes less dense. If the mixture looks grainy, the cream cheese was too cold or you stopped too early.
Layering the Fruit and Glaze
Pipe a generous swirl into each shell, then press one or two thin peach slices gently into the top. Don’t overload the tart with fruit or the cream will squish out at the sides. Whisk the jam or honey with warm water until it turns brushable, then drizzle or brush it over the peaches. That thin glaze should look shiny, not sticky or opaque.
Letting the Tarts Set Before Serving
Refrigerate the assembled tarts for 30 minutes so the glaze settles and the filling firms up slightly. That short chill is what helps them hold together on a platter. Add the thyme right before serving so it stays fresh and fragrant instead of wilting in the fridge.
How to Adapt These Mini Peach Cream Cheese Tarts When the Fruit or Crowd Changes
Use nectarines instead of peaches
Nectarines work the same way and save you the peeling step if the skins are thin and tender. Slice them just as thinly as peaches, since thicker pieces can slide off the cream filling.
Make them dairy-free
Use a dairy-free cream cheese that’s designed for baking or spreading. The texture will be a little softer and less rich, so chill the filled tarts before serving and keep the fruit layer light.
Swap the glaze
Apricot jam gives a clearer, more neutral shine if you want the peaches to stay front and center. Heat it with the water the same way, then strain it if the jam has chunks you don’t want on top of the tarts.
Scale them for a larger dessert tray
Double the filling first, then count out the shells and fruit so you don’t run short at the end. These are best assembled close to serving, so if you’re making them for a crowd, fill the shells earlier and add the peaches and glaze after the shells have had a chance to chill.
Storage and Reheating
- Refrigerator: Store assembled tarts for up to 2 days. The shells soften as they sit, so they’re best on day one.
- Freezer: These don’t freeze well once assembled because the peaches turn watery and the filling loses its smooth texture.
- Reheating: Don’t reheat these. Serve them cold straight from the fridge, and if you want the shells extra crisp, warm and cool the shells ahead of time before filling them.
Answers to the Questions Worth Asking
Mini Peach Cream Cheese Tarts
Ingredients
Equipment
Method
- Preheat oven to 350°F, then bake the mini phyllo tart shells on a sheet pan for 5 minutes until lightly crisped and lightly golden. Transfer to a rack and cool completely so the filling won’t melt.
- Beat cream cheese, powdered sugar, vanilla extract, and lemon zest until very smooth and fluffy. Stop and scrape the bowl as needed to remove any lumps for a clean swirl.
- Transfer the filling to a piping bag or zip-lock bag with a corner snipped. Pipe a generous swirl into each cooled tart shell, filling up close to the top.
- Press 1–2 thin peach slices gently into the cream cheese on each tart. Arrange the slices so they sit flat and show their bright color.
- Whisk peach jam with warm water until pourable, then brush or drizzle a thin glossy layer over each tart. Chill the tarts for 30 minutes to set the glaze.
- Garnish with fresh thyme sprigs before serving to add a fresh, aromatic finish. Serve chilled for the best creamy texture and sliceable peach topping.