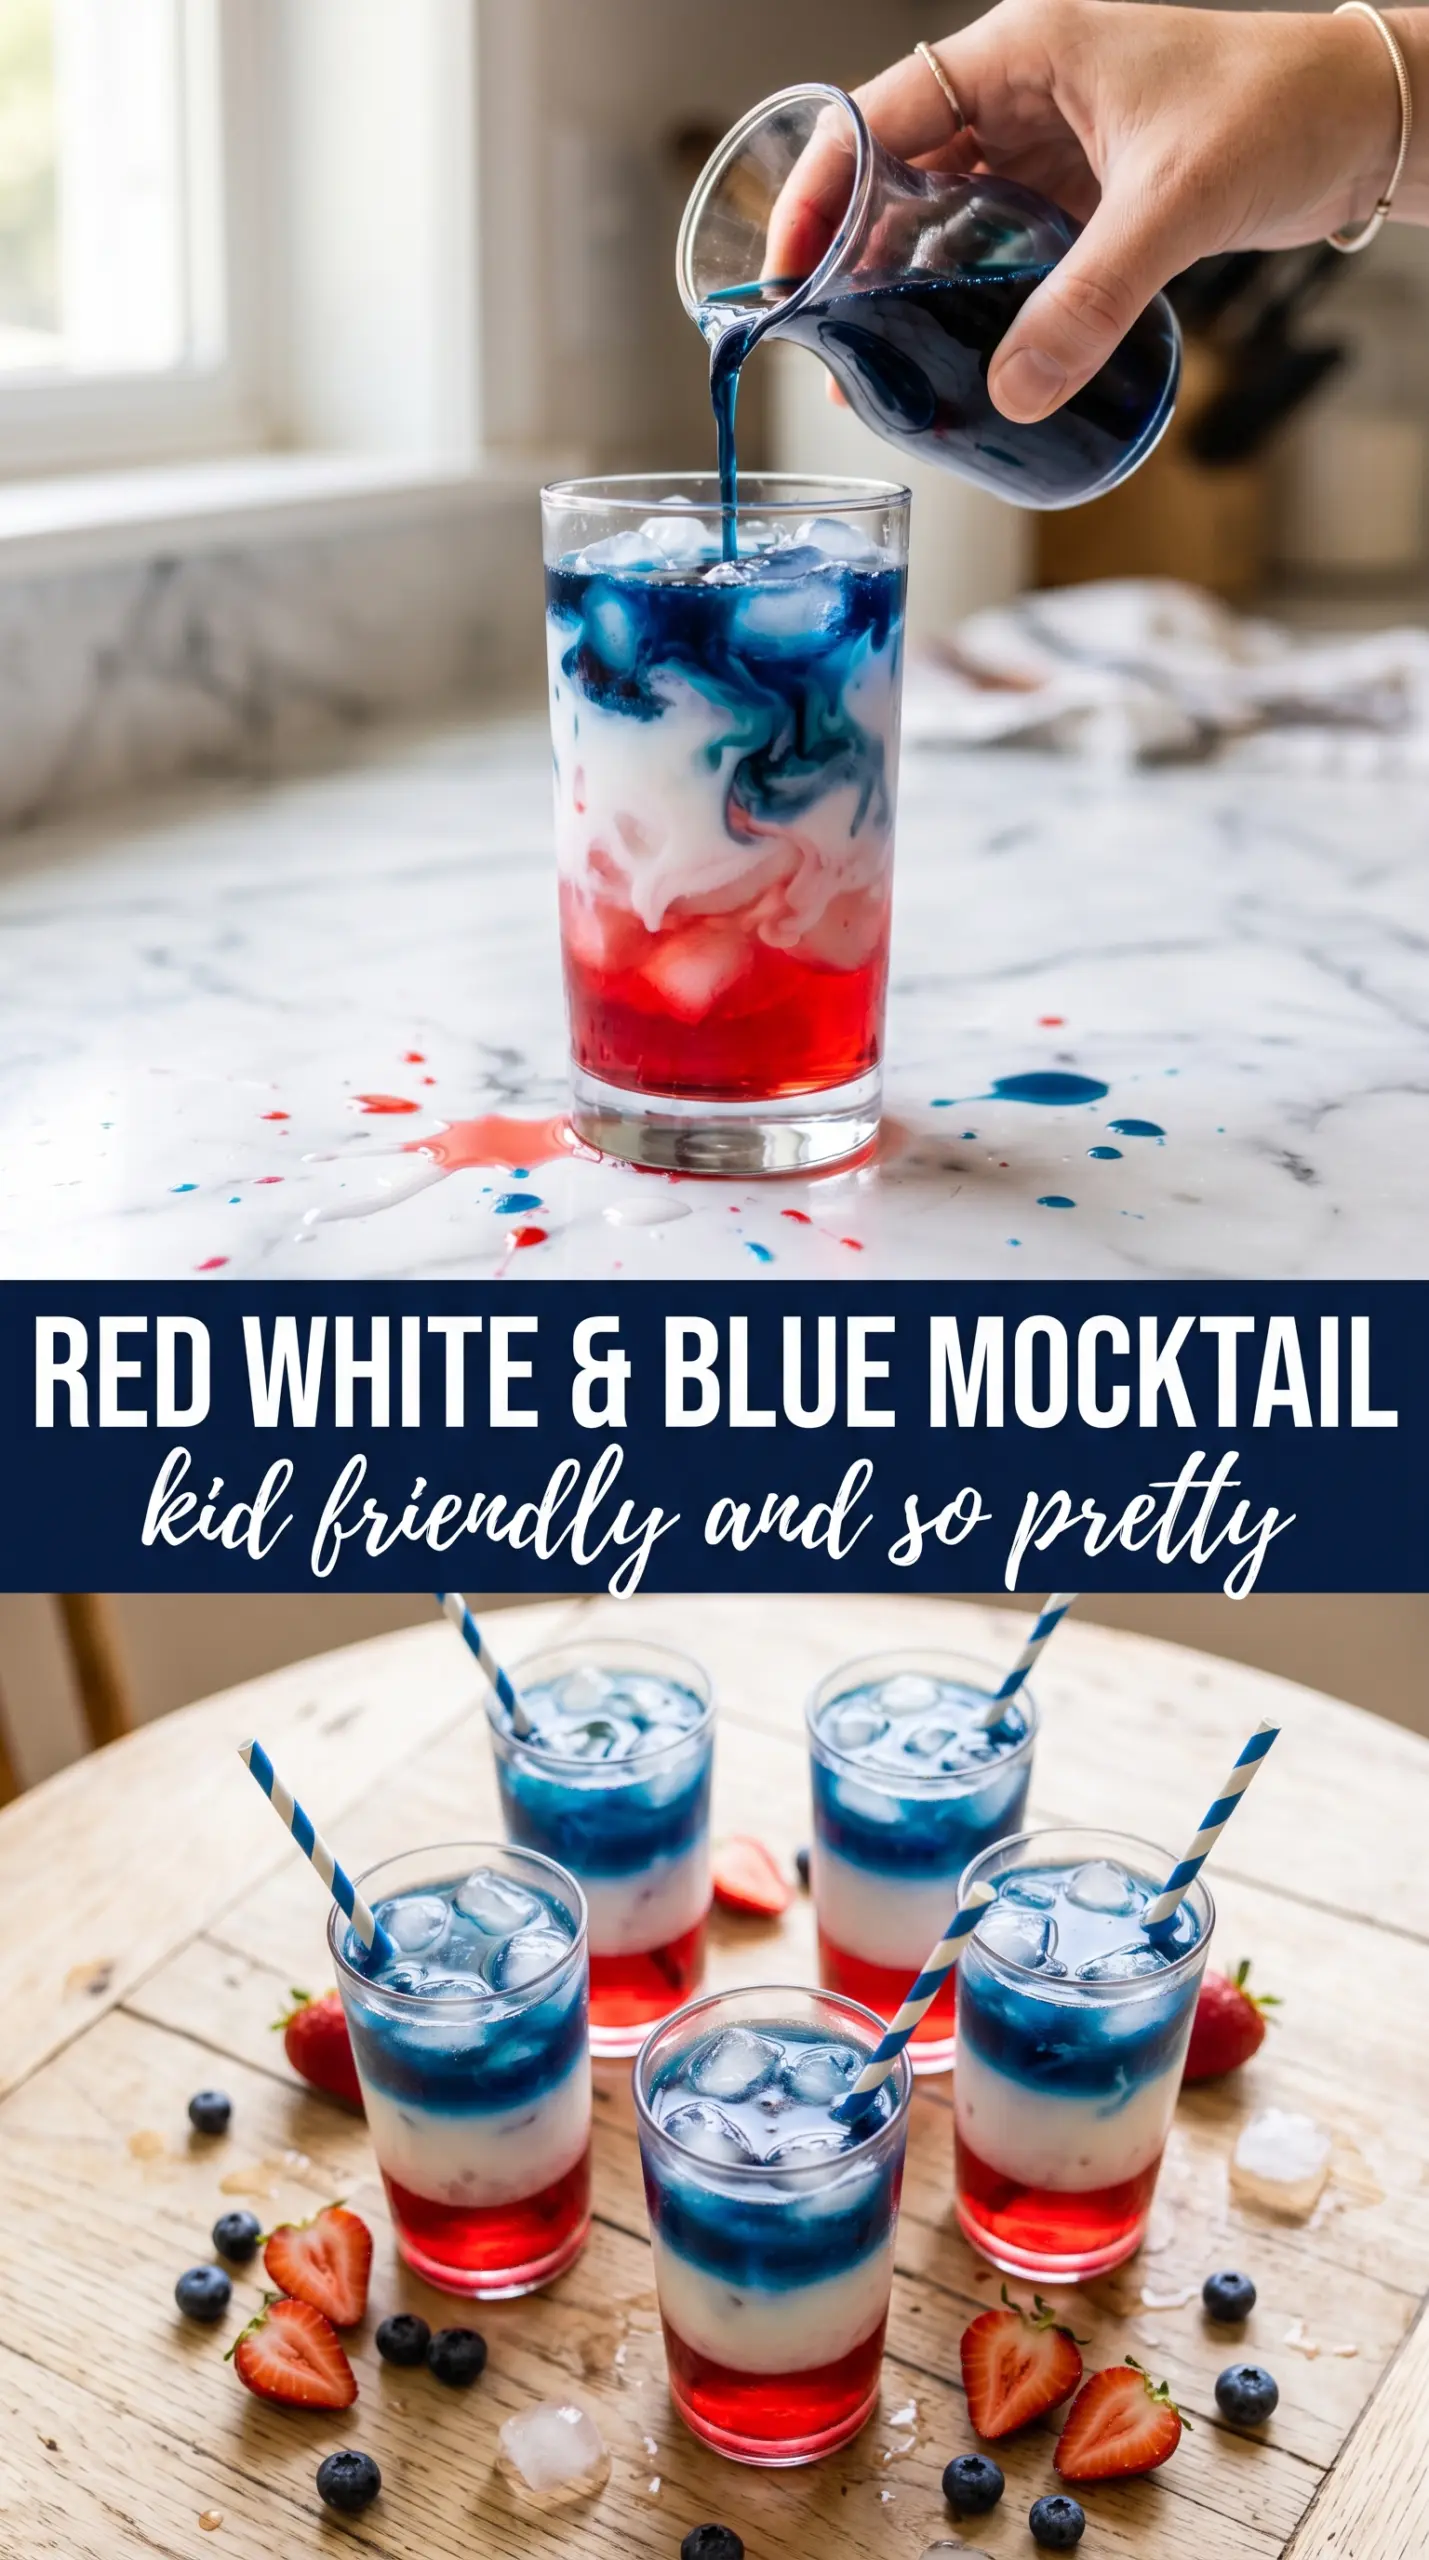
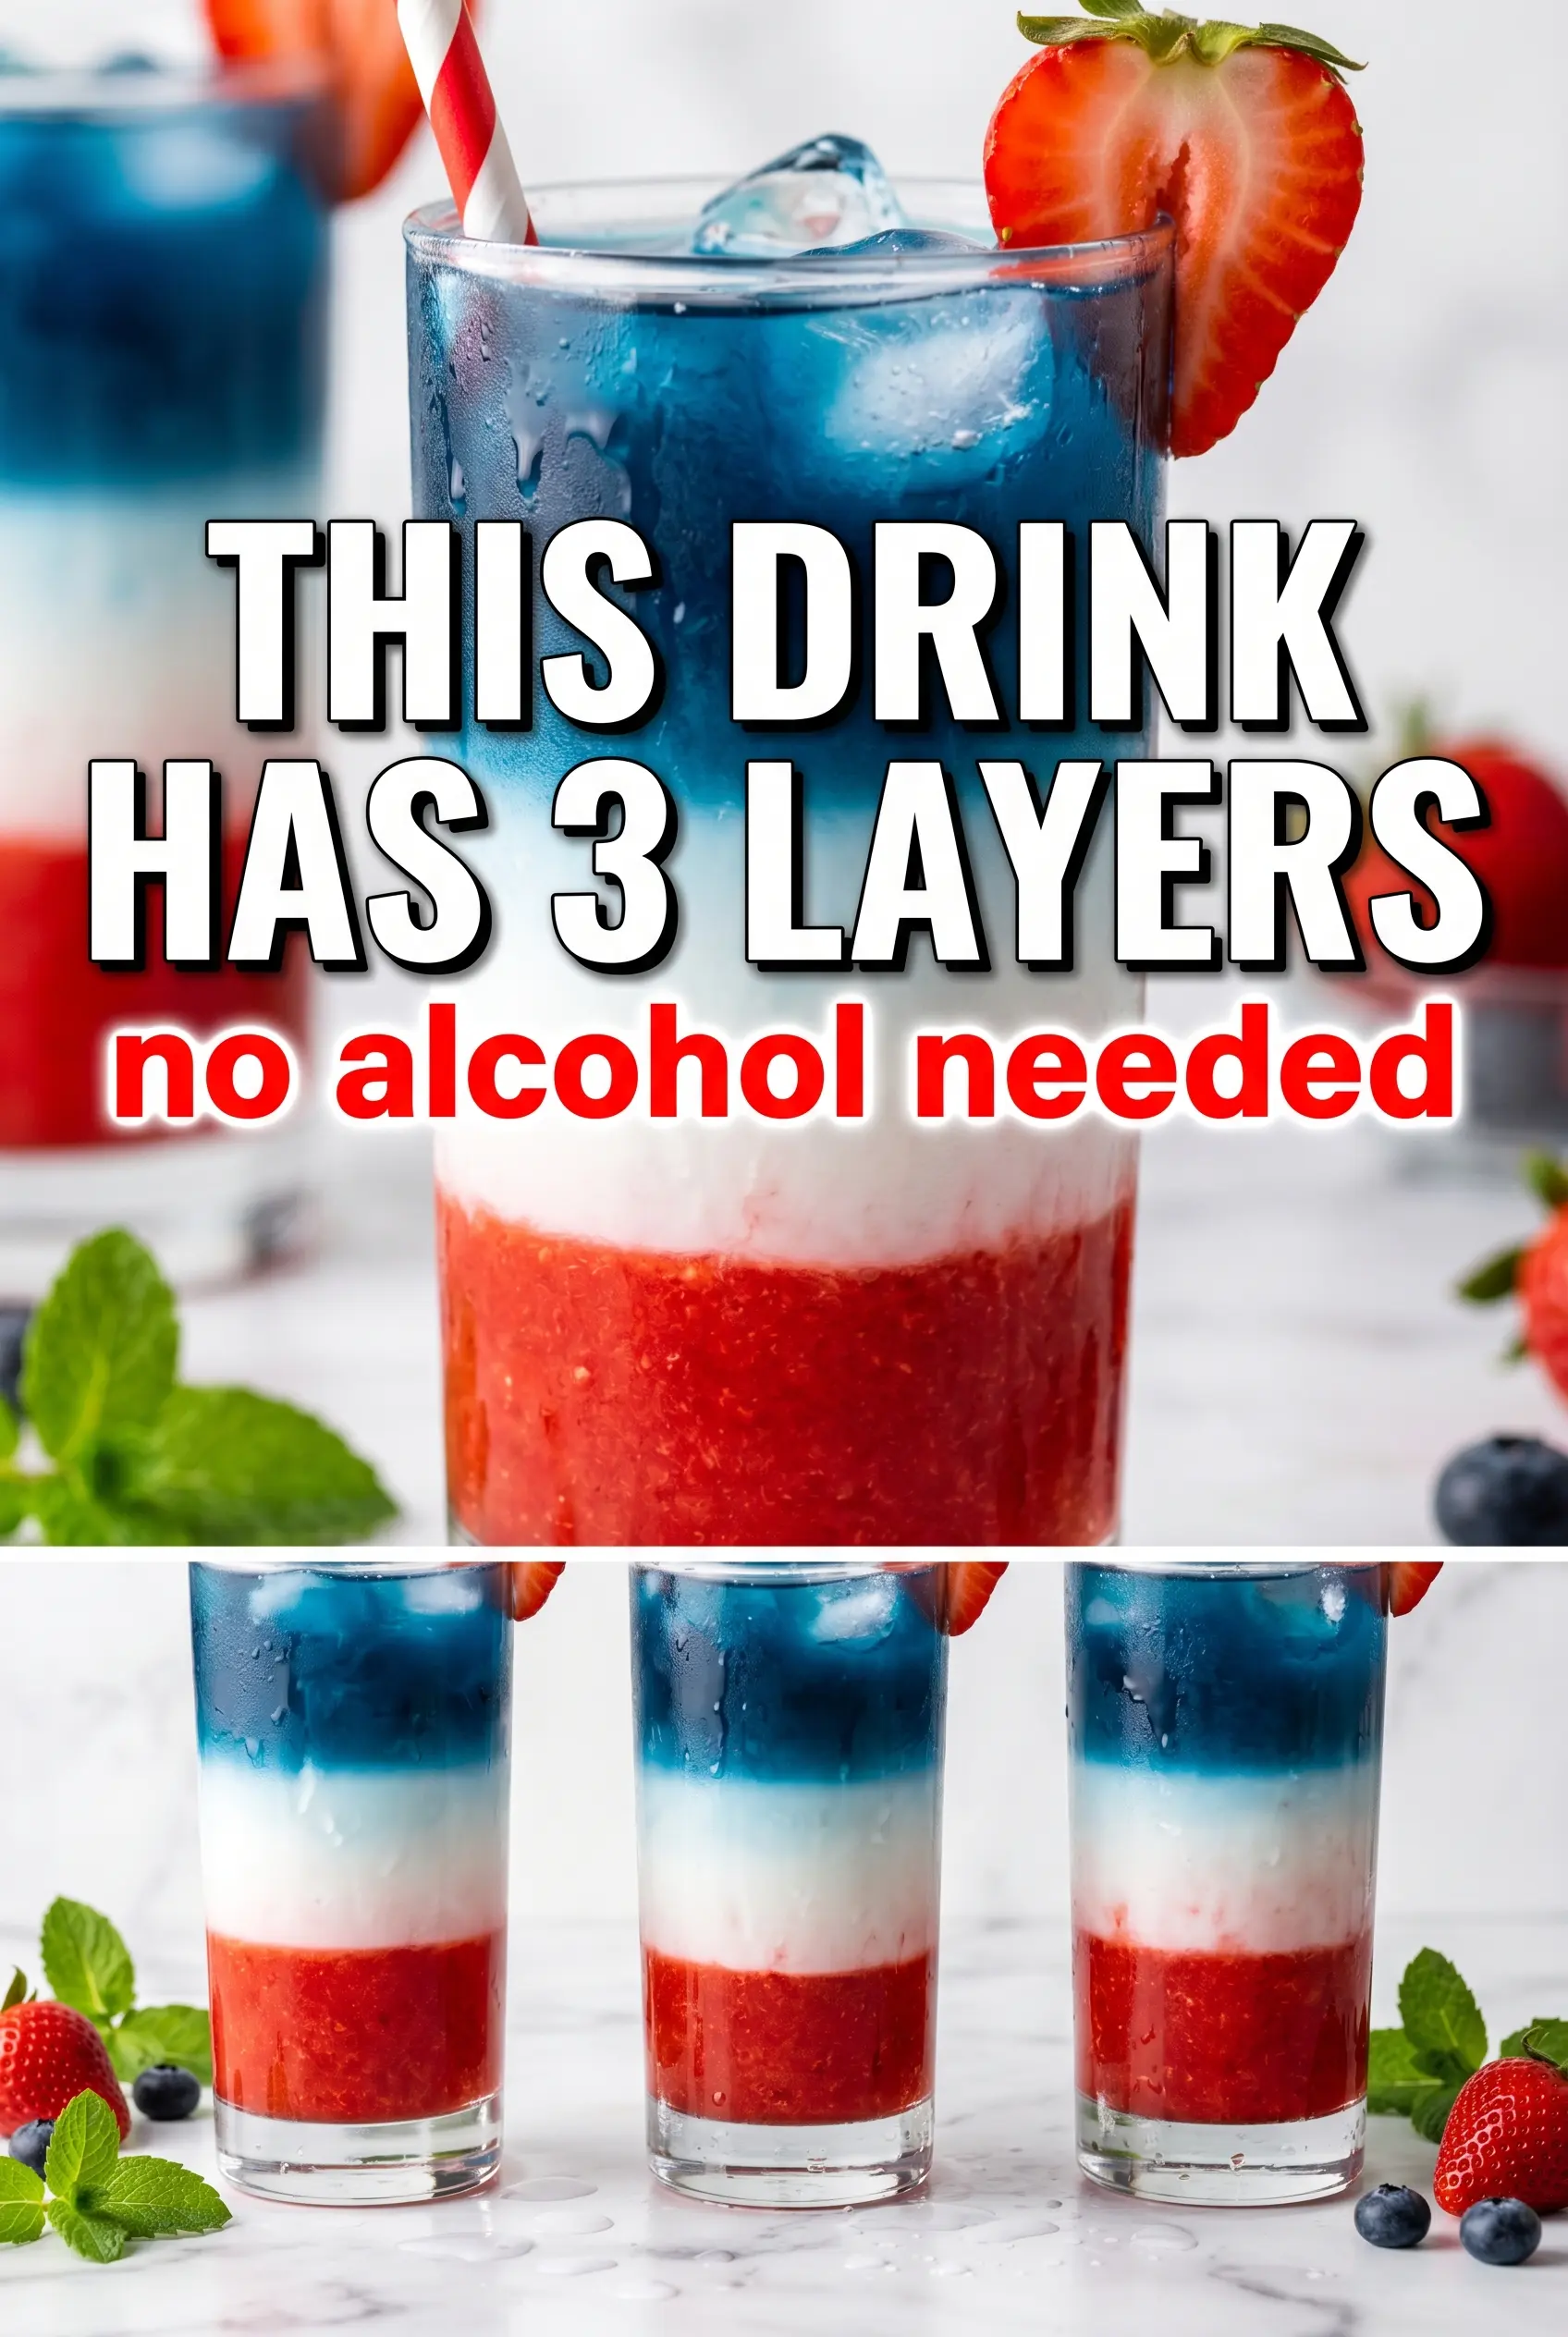
Three distinct layers make this drink feel special before anyone even takes a sip. The grenadine settles into a deep red base, the lemonade sits bright and clear in the middle, and the blue raspberry layer floats on top for that bold, striped look that holds up long enough to serve. It’s one of those drinks that gets attention fast, then disappears just as quickly once people realize it tastes as good as it looks.
The trick is control, not complexity. Cold ingredients help the layers stay put, but the real difference comes from pouring slowly over the back of a spoon so each liquid lands gently instead of crashing through the glass. Ice also matters here because it gives the layers something to rest on and slows the mixing just enough to keep those lines sharp. If you’ve ever watched a layered drink blur together on the way to the table, this method fixes that.
Below, I’ll walk through the small details that keep the colors separated, plus a few easy ways to adapt the drink for parties, different flavor combinations, or make-ahead serving.
The layers stayed sharp all the way to the table, and the blue top layer over the red and yellow looked just like the photo. I served them for a birthday party and the kids kept asking for the “rainbow drink” again.
Like these vibrant non-alcoholic layered drinks? Save this recipe for parties when you want a colorful mocktail that looks fancy with almost no work.
The Layering Trick That Keeps the Colors Clean
The biggest mistake with layered drinks is pouring too fast. When the liquid hits the glass with any force, the layers mix instead of stacking, and the whole drink turns muddy in seconds. Cold ingredients help, but the real safeguard is the slow pour over the back of a spoon, which softens the stream and lets each layer settle on top of the one below.
Ice cubes do more than chill the drink. They create structure inside the glass and help break the pour so the liquid doesn’t punch straight through the center. Use a tall clear glass, because short glasses don’t show the layers well and leave you less room to work. If your layers keep blending, the drinks were probably poured too quickly or were warm from sitting on the counter.
What Each Ingredient Is Actually Doing in This Recipe
- Primary ingredient (the star) — Quality matters most. Choose the best you can find.
- Cooking medium (oil, butter, or broth) — This carries flavors and prevents dryness.
- Seasonings (salt, pepper, spices, herbs) — Layer flavors so nothing overpowers. Build depth gradually.
- Aromatics (garlic, onion, herbs) — Cook with fat to bloom flavors. Become the foundation.
- Supporting ingredients — Complement the main ingredient without overpowering it.
- Sauce or liquid (if applicable) — Brings flavors together. Balance richness with acid.
- Acid (lemon, vinegar, wine, or other) — Brightens and prevents flat-tasting results.
- Final finish (garnish, glaze, or sauce) — Prevents one-dimensional taste and adds visual appeal.
What Each Color Is Doing in the Glass
- Grenadine syrup — This is the heaviest layer, so it drops straight to the bottom and gives the drink that jewel-toned base. There isn’t a perfect substitute if you want the same color and weight, although pomegranate syrup can work in a pinch with a slightly tarter finish.
- Lemonade — The lemonade gives you the bright middle band and keeps the drink tasting fresh instead of candy-sweet. Bottled lemonade works fine as long as it’s chilled; if it’s warm, it mixes too easily.
- Blue raspberry sports drink or blue raspberry lemonade — This top layer brings the dramatic color contrast. Pick the lighter, thinner option if you can, because thick or syrupy drinks are harder to float cleanly.
- Ice cubes — Ice is part of the technique here, not just the chill. Fill the glass nearly to the top so each layer has less distance to travel and less chance to collide.
- Maraschino cherries and striped straws — These are garnish, but they also sell the whole look. The cherry adds a bright finish on top, and the straw gives people an easy way to stir the drink once they’re ready to mix it.
Stacking the Layers Without Clouding the Glass
Build the Ice Base
Fill a tall clear glass with ice cubes almost to the top. The ice should sit high enough to slow the pour but not so packed that there’s no room for the liquid to move around it. If the glass is only half full, the layers have too much space to fall and mix.
Pour the Grenadine First
Pour the grenadine slowly over the ice so it sinks to the bottom. It should slip downward and form a clear red base right away. If it starts to streak upward through the ice, the pour was too aggressive.
Float the Lemonade in the Middle
Hold a spoon just above the ice and pour the chilled lemonade over the back of it in a thin stream. That gentle spread keeps the lemonade from punching through the grenadine and lets it settle as a bright middle layer. Warm lemonade is the fastest way to lose the separation, so chill it first.
Finish With the Blue Top
Use the same spoon trick for the blue raspberry drink and pour it slowly to float on top. Stop as soon as the glass is full, then garnish right away with a maraschino cherry and a striped straw. Don’t stir the drink before serving or the whole effect is gone.
Ways to Change the Colors, Sweetness, or Serving Style
Make it less sweet
Swap the blue raspberry lemonade for a lighter sports drink and use a less sugary lemonade in the middle. You’ll still get the three distinct layers, but the drink reads fresher and less candy-like.
Make it gluten-free and allergy-friendly
This drink is naturally gluten-free as long as your lemonade and blue raspberry drink are labeled that way. Skip garnishes with hidden additives and stick with plain maraschino cherries if you’re serving a crowd with mixed dietary needs.
Turn it into a party punch
For a bigger batch, layer the drinks in a clear punch bowl or individual clear cups instead of trying to build one giant glass. The visual effect is strongest when the layers stay separate, so serve it right after assembling rather than letting it sit.
Storage and Serving Prep
- Refrigerator: The individual ingredients can be chilled ahead of time for up to 2 days, but the assembled drink should be served immediately or the layers will blend.
- Freezer: Don’t freeze the finished drink. The texture breaks down once it thaws and the layers won’t come back cleanly.
- Serving: Set out the glasses, ice, spoon, and garnishes before you start pouring so the layers go from glass to table without delay. The longer the drink sits, the more the edges soften and mix.
Answers to the Questions Worth Asking
Non-Alcoholic Layered Drinks
Ingredients
Method
- Fill a tall clear glass with ice cubes almost to the top, leaving a small gap at the rim for clean pouring. The glass should look frosty with visible ice fill.
- Pour 1/4 cup grenadine syrup slowly over the ice from a steady height, letting it sink to the bottom as the first layer. Watch for the deep red layer to form without splashing up the sides.
- Gently pour the chilled lemonade over the back of a spoon held just above the ice to create a clean middle layer. Keep the stream low so it floats on top and stays golden.
- Pour the chilled blue raspberry drink over the spoon the same way to float it as the top layer. Stop once you reach the desired fill level so the blue layer stays distinct.
- Garnish with a maraschino cherry and a striped straw and serve immediately without stirring. The layers should remain visibly separated when you set it down.