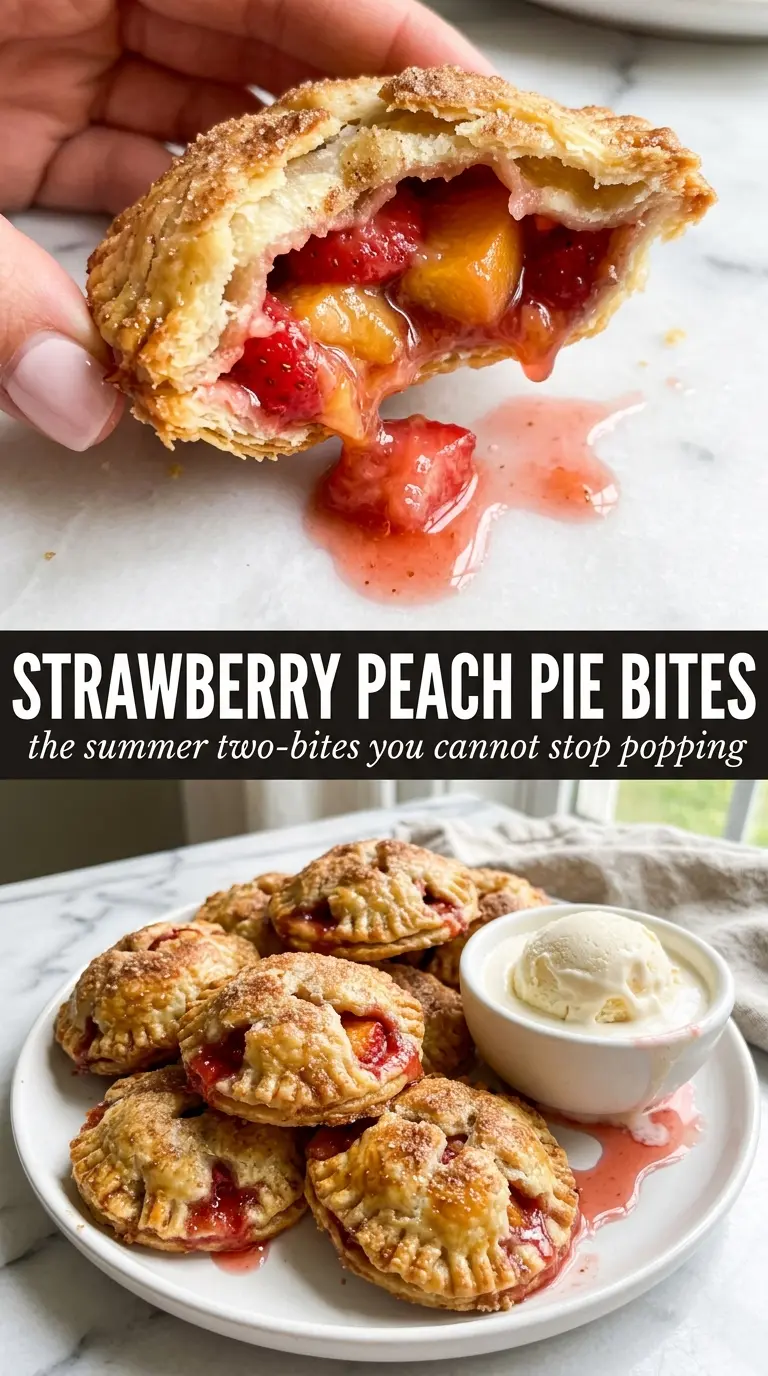
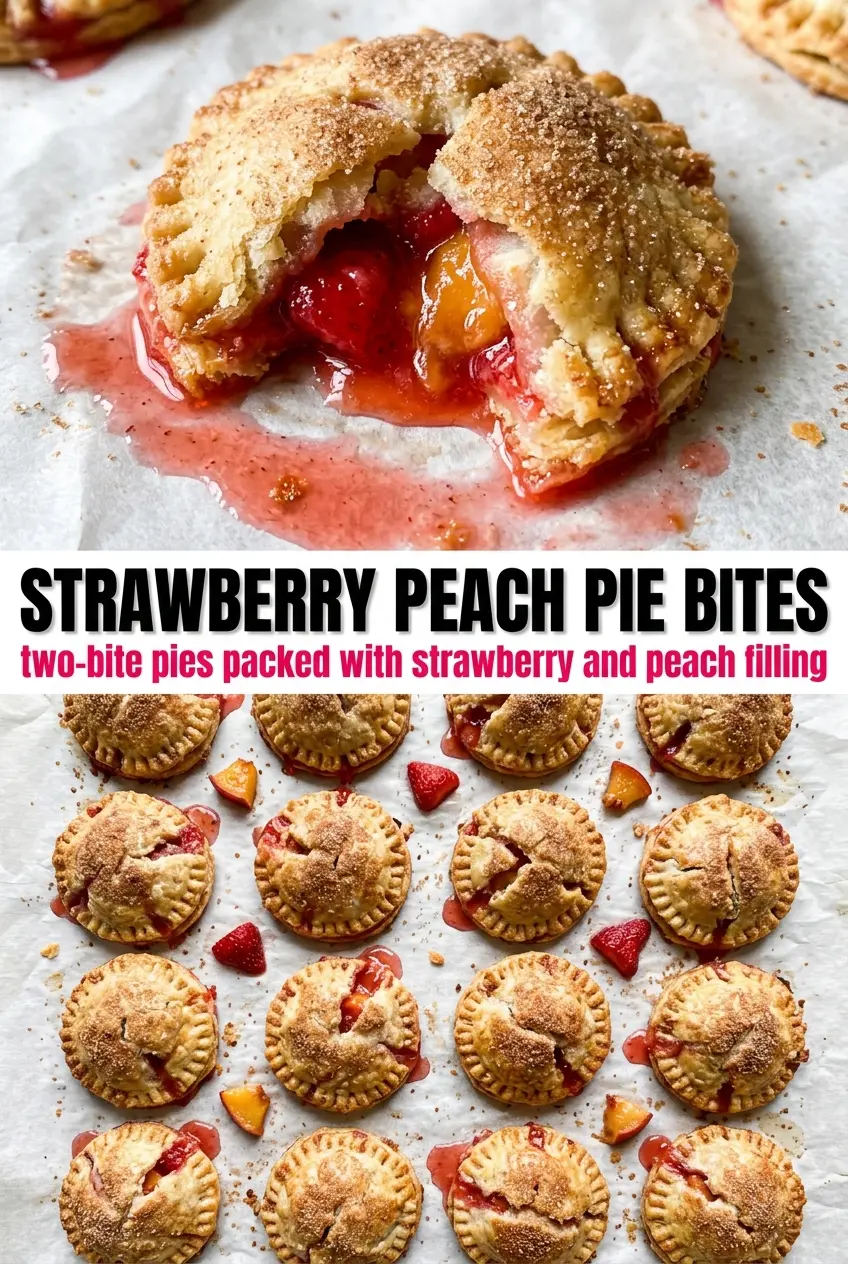
Strawberry Peach Pie Bites bake up with the kind of crisp, buttery edges and jammy fruit centers that disappear fast from a dessert tray. The little crimped tops turn deeply golden in the oven, and the filling settles into that sweet spot between juicy and set, so each bite tastes like a miniature hand pie instead of a soggy fruit cup.
The trick is keeping the fruit pieces small and the filling lightly thickened before it ever goes into the oven. Strawberries and peaches both let go of a lot of juice, and the cornstarch needs enough time and heat to do its job without turning the fruit gluey. A thin layer of pie crust pressed into a mini muffin tin gives you the flaky shell, while the egg wash helps those tiny lattice tops bake up glossy and browned.
Below, I’ve included the one timing cue that keeps the bottoms from going soft, plus a few easy swaps if your peaches are extra juicy or you need to work with frozen fruit.
The filling set up beautifully and the bottoms stayed crisp, which never happens with mini fruit pies in my oven. I loved how the peaches and strawberries tasted together once they cooled.
Love the jammy strawberry peach filling and flaky mini crust? Save these pie bites to Pinterest for your next easy dessert tray.
The Reason Mini Fruit Pies Stay Crisp Instead of Getting Soggy
The biggest mistake with mini fruit pies is filling them with fruit that’s already leaking juice before they hit the oven. Once that liquid soaks into the crust, you lose the flaky base and end up with soft bottoms. Here, the cornstarch and sugar are tossed with the fruit first, which gives the filling a head start on thickening and keeps the filling from flooding the pastry cups.
The other thing that matters is the bake time. These need enough heat to cook the crust through, but not so much time that the fruit collapses into a watery puddle. You’re looking for browned edges, bubbling filling, and a crust that feels set when you tap it lightly with the tip of a knife.
- Fresh strawberries — Dice them small so they soften quickly and settle into the bites without breaking apart into mush. Larger chunks release more juice and make the filling harder to control.
- Ripe peaches — Choose peaches that yield slightly when pressed but aren’t overly soft. If they’re too ripe, the filling can turn loose before the pies even finish baking.
- Cornstarch — This is what turns the fruit juices into a glossy, spoonable filling instead of runny syrup. Arrowroot works in a pinch, but cornstarch gives the most reliable set in this recipe.
- Refrigerated pie crust — Store-bought crust keeps this recipe fast and still bakes up flaky if you don’t overwork it. Roll it gently and cut clean circles so the dough doesn’t shrink too much in the muffin tin.
What Each Ingredient Is Actually Doing in This Recipe
- Primary ingredient (the star) — Quality matters most. Choose the best you can find.
- Cooking medium (oil, butter, or broth) — This carries flavors and prevents dryness.
- Seasonings (salt, pepper, spices, herbs) — Layer flavors so nothing overpowers. Build depth gradually.
- Aromatics (garlic, onion, herbs) — Cook with fat to bloom flavors. Become the foundation.
- Supporting ingredients — Complement the main ingredient without overpowering it.
- Sauce or liquid (if applicable) — Brings flavors together. Balance richness with acid.
- Acid (lemon, vinegar, wine, or other) — Brightens and prevents flat-tasting results.
- Final finish (garnish, glaze, or sauce) — Prevents one-dimensional taste and adds visual appeal.
How to Fill and Bake Them So the Tops Brown Before the Fruit Breaks Loose
Building the Fruit Filling
Toss the strawberries and peaches with the sugar, cornstarch, lemon juice, and cinnamon until every piece looks lightly coated. The mixture will look a little wet, and that’s fine; the cornstarch needs that moisture to activate. Let it sit while you prep the crust so the fruit starts releasing juice and the filling goes into the muffin tin already partially thickened.
Shaping the Crust Cups
Press each 3-inch dough round into the mini muffin cups without stretching it hard. If you tug the dough, it shrinks back in the oven and can pull away from the sides before the filling sets. A gentle press gives you taller edges, which helps catch the fruit juices and keeps the top from bubbling over.
Filling and Topping
Spoon in a heaping teaspoon of fruit and stop there. Overfilling is what causes the lattice strips to slide off and the juices to spill into the pan, where they can burn before the crust is done. Criss-cross the small dough strips over the top, then brush them with egg wash so they bake shiny and deeply golden instead of pale and dry.
Baking Until the Centers Set
Bake until the tops are browned and the fruit is visibly bubbling at the edges, about 16 to 18 minutes. If the filling isn’t bubbling, the cornstarch hasn’t fully activated yet, which means the bites may look done but still leak when they cool. Let them rest in the pan for 15 minutes so the filling firms up before you move them or dust them with powdered sugar.
Three Ways to Work These Into Different Kitchens and Different Fruit Bins
Frozen Fruit Version
Use frozen strawberries and peaches straight from the freezer, but add them while still frozen and expect a slightly longer bake. Don’t thaw first or they’ll dump too much liquid into the filling and make the crust soft before it has a chance to brown.
Gluten-Free Crust Swap
Use a gluten-free pie crust that rolls well and holds its shape in a muffin tin. The filling stays the same, but GF dough usually browns a little faster, so start checking a minute or two early and watch the edges closely.
All-Peach or All-Strawberry Filling
You can use 3 cups of one fruit if that’s what you have, but keep the cornstarch and lemon juice in place. All-peach bites taste softer and more floral, while all-strawberry bites set a little more jammy and need the full cooling time to firm up.
Storage and Reheating
- Refrigerator: Store in an airtight container for up to 4 days. The crust softens a little after day one, but the filling stays set.
- Freezer: These freeze well once cooled. Freeze on a tray, then move to a sealed container and thaw overnight in the fridge.
- Reheating: Warm in a 300°F oven for 6 to 8 minutes. The common mistake is microwaving them, which makes the crust go limp and the filling leak.
Questions I Get Asked About This Recipe
Strawberry Peach Pie Bites
Ingredients
Equipment
Method
- Preheat the oven to 375°F and spray a 24-cup mini muffin tin with cooking spray so the pie bites release cleanly.
- Set out a 3-inch round cutter and roll out the refrigerated pie crusts, ready to cut circles for each muffin cup.
- Toss the finely diced strawberries and peaches with granulated sugar, cornstarch, fresh lemon juice, and cinnamon, then set aside to thicken slightly.
- Cut the dough into 24 circles using a 3-inch round cutter and press one circle into each muffin cup for formed pastry walls.
- Fill each cup with a heaping teaspoon of the fruit filling, leaving a little room for criss-cross tops.
- Cut small strips from the remaining dough and criss-cross them over the tops, then brush with the beaten egg mixed with water for a glossy finish.
- Bake at 375°F for 16-18 minutes until the mini pastry cups are golden at the edges and set on top.
- Cool for 15 minutes, then dust with powdered sugar and serve while the centers are jammy.